.png)

Dhruv Bhutani has been writing about consumer technology since 2008, offering deep insights into the personal technology landscape through features and opinion pieces. He writes for XDA-Developers, where he focuses on topics like productivity, networking, self-hosting, and more. Over the years, his work has also appeared in leading publications such as Android Police, Android Authority, CNET, PCMag, and more. Outside of his professional work, Dhruv is an avid fan of horror media spanning films and literature, enjoys fitness activities, collects vinyl records, and plays the guitar.
If you're anything like me, your computer's files and folders situation is dire. You download something, take a few screenshots, maybe copy over a few photos, and promise yourself that you will sort it all later. As it turns out, before long, your desktop is starting to look a little bit like mine. That is, pretty darn untidy with files sorted all over the place, and the one you file you need is impossible to find. But it doesn't have to be an impossible task. A few simple automations are all it takes to make the mess disappear. Keep in mind, I use Hazel on a Mac to pull these off, but you can even use the built-in Automator scripts to achieve the same results. And if you're on a Windows machine, the powerful Power Automate utility will get you there. Once you've set them up, your files move themselves exactly where they should go.
Tame your downloads folder
Don't let it become the dumping ground for all your downloads
Let's be honest, the downloads folder is always the worst offender. It's the de facto dumping ground for all your downloads and anything else. And it never leaves. I'm used to having hundreds of files in there at any given point in time, with everything from PDFs, random images, installers, and zip archives all mixed up together.
The fix to that is to organize it better, specifically by the kind of files they are. It might be your dumping ground, but it doesn't have to stay that way. On my Mac, I use an app called Hazel. I've created rules that look at file types. PDFs are stored in a sub-folder called Documents, and all image file types are stored in a sub-folder called Pictures. Similarly, archives and DMG files are placed in their own folders. Once the rule is running, Hazel does the rest.
If you're using Windows, you can achieve a similar workflow with Power Automate Desktop. Simply add the conditions that define how and where you want the files to be moved, and it'll automatically transfer files to the predefined locations.
Keep screenshots out of sight
Organize the chaos and keep your desktop clean
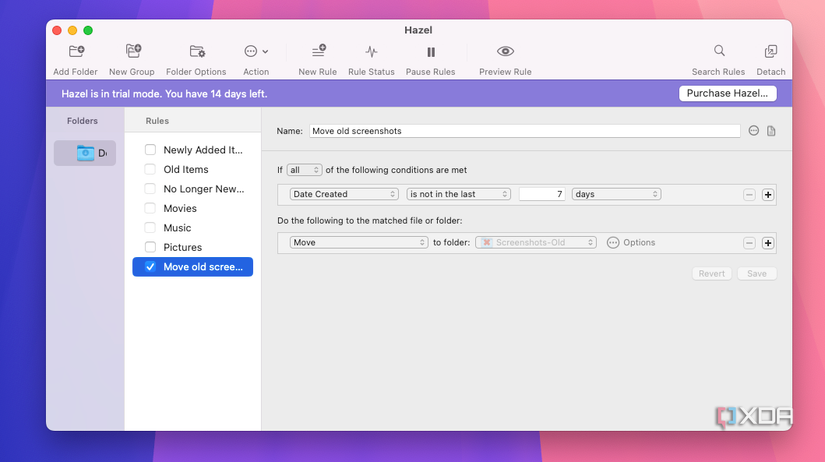
As a journalist and writer, screenshots are the backbone of illustrating everything I talk about. Predictably, I take a lot. For the longest time, my desktop used to be flooded with a wide range of project folders full of screenshots, which I'd bulk delete every few months.
But there's a way to improve it. If your screenshot needs are relatively basic, you could probably get away with using your Mac's built-in screenshot organization tool. This takes every screenshot and dumps it into a default screenshots folder on your desktop. Similarly, you can change the default screenshot storage location for your Windows computer to a specific folder.
But there are better ways to manage this. For example, I've set Hazel on Mac to automatically sort these screenshots by month and move them into individual sub-folders. Windows users can achieve the same using Power Automate. Additionally, you can also set up automations to automatically delete the folder after a set amount of time. In my setup, I've configured Hazel to use a condition that checks the last modified date of files in my screenshots folder, and if it is more than 30 days old, it automatically deletes the files.
That's all it takes to give your screenshots a fixed home, keep your desktop clean. And if you need something, the additional month-based organization comes in handy to pull out relevant files with ease.
Offload large files automatically
Keep your storage clean without lifting a finger
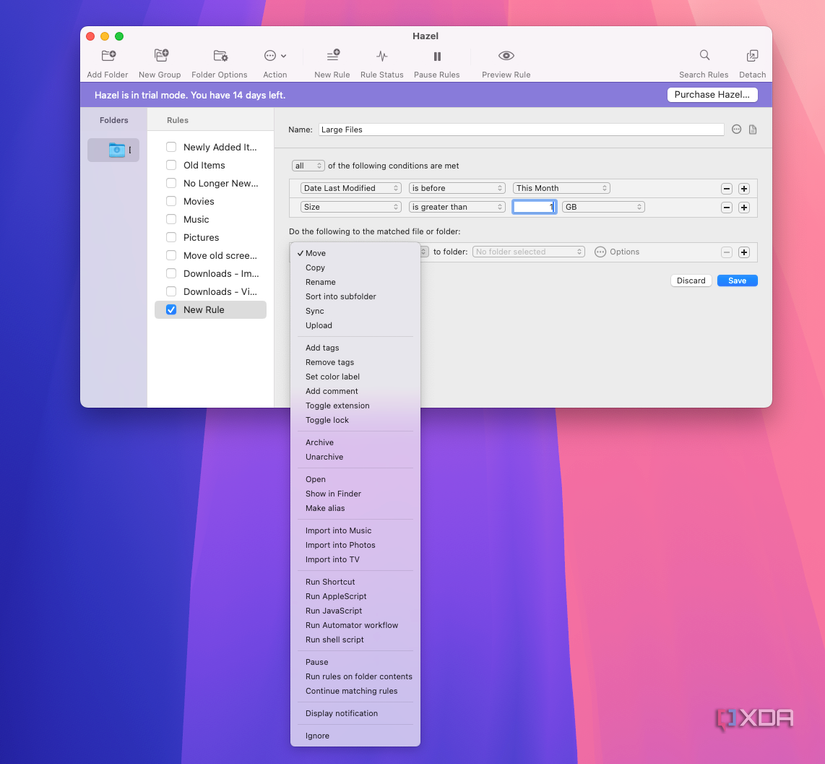
If your main computer is a laptop like mine, you'll understand the pain of constantly running out of storage. It's inevitable that you'll be storing photos, large files, installation files, and more. But more importantly, you'll forget about them occupying space on your SSD. To solve this problem, I use an assortment of Hazel automations that work in tandem. For example, I don't want to lose my main photo library, so Hazel automatically detects files that haven't been modified in over a month and moves them to a folder on my external drive.
Similarly, it goes through my downloads bin and if a file is over one gigabyte and hasn't been touched in two weeks, it'll move the files to the bin. If you are on Windows, Power Automate can achieve the exact same results to great effect. This simple automation goes a long way towards keeping my storage free of clutter and helps my computer run smoothly.
Small rules, big results
None of these automations is complicated or hard to set up, but the pay-off is huge. To start with, my laptop is no longer bogged down with unnecessary files, photos, and screenshots hogging up space. But more than that, all the files I do need are also better organized, not just by file type subfolders, but also in month-based directories. That's a big win for the organization. Moreover, once the rules are running, you never have to think about them again until you want to change something. Apps like Hazel and Power Automate do all the work for you.

Hazel lets you define rules and conditions to automatically move and rename files and folders based on a set of conditions allowing you to have a clean folder structure with ease.


 English (US) ·