.png)
MX Linux is one of the more distinct-looking Linux distributions that tries to make the overall operating system experience less cumbersome for the average user. If you've tinkered with Linux-based distros in the past or use one now, you probably leverage the terminal for even basic setting changes and tweaks. But it's not 2010 anymore, and simple GUI options for routine and necessary operating system actions should be more mainstream. After switching to MX Linux, I discovered many useful tools that make the OS settings and customization remarkably easy.
I miss these tools on my Ubuntu and other systems whenever I use them. Whether configuring boot options, changing the Xfce panel design, or creating a system snapshot, MX Linux has a solution for everything, along with rich documentation to help you use the tools. Here are my four favorite tools that other mainstream Linux distributions should adopt in the future.
MX Snapshots
Preserve system data with an ISO file
I'm sure you have had distro crash experiences where your Linux OS won't boot. In such cases, there's no other remedy than to reinstall everything while cursing about the lack of a system backup/image-creating feature. MX Snapshots fills this massive gap and lets you create a bootable ISO file to reinstall the operating system. But can't you create a bootable ISO file of any OS with Etcher or a similar USB creation tool?
MX Snapshots is different because it creates a system image with all the user data you can use to create a backup. I love the idea of creating an ISO file that you can offload to another USB SSD and use whenever your system encounters an unrecoverable state. The ISO size can be huge depending on your data, but you have granular control over what to include in the snapshot.
For instance, I tend to exclude things like Steam, Flatpaks, or other folders to significantly reduce the ISO size. You can also exclude the user account, which makes it beneficial if you want to install the same system on a different PC for your family member. This way, all the data is there, but they can create new users while installing the OS from this Snapshot.
The only thing missing is that you cannot use the snapshot within the system to restore to a previous working state. You must use a USB drive to access or reinstall the operating system. After you create a snapshot, you can use the USB live maker to create a bootable USB to access or reinstall your MX Linux installation.
MX Package Installer
Install from multiple repositories
The MX Package installer is another utility I cannot live without, especially because it reduces the app installation problem. I'll share an encounter while trying to install a resource manager app called Resources on Ubuntu. The app store failed to download the tool despite repeated tries and didn't even warn me about the problem. I switched to its Flatpak listing, which required me to set up Flatpak first and then proceed with the installation. But MX Linux has a different approach.
MX Package Installer offers an in-built tab for browsing and installing Flatpak, making it a one-click operation to install any of the 3,200 apps available. Its default repo list has pre-defined categories and search features to narrow down your favorite app faster.
If I were a user transitioning to Linux, this would change how I would install an app in the OS. Ubuntu has an app store, and you can add third-party repositories. Still, it's barebones compared to the MX Linux Package Manager, which describes every app entry with multiple installation options.
MX Boot
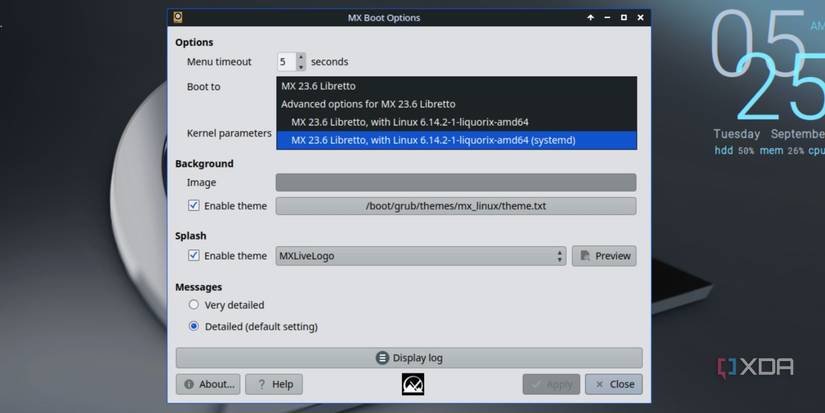
This one is an under-appreciated utility that deserves more recognition. I've had my fair share of problems while dual-booting operating systems and would love more control over the GRUB menu. MX Boot lets you change these settings, kernels, and themes to your preference, which I found useful while reviving my old laptop with MX Linux.
The first thing I changed was the boot menu timeout, which allows me more time to access and interact with it. If you prefer a specific kernel, you can also use MX Boot and go into the advanced options to change the default kernel to boot. There are visual customization options available that let you adjust the appearance and themes of the Boot menu, too. I like the default one, but you have ample choices.
MX Tweak
Fine-tune operating system and app settings
If there's a tool in MX Linux that overwhelmed me, it's MX Tweak. So many options are available across seven tabs that you'll have to invest time to become comfortable with them. You can directly manage panels, window managers, and system appearance from this tool.
For example, the vertical taskbar on the right is a panel, and you can adjust its visibility, size, and the apps that appear inside. You can add more panels for a custom desktop look, but that takes some skill.
I spend most of the time with the config options and other tabs, which list multiple small settings that can make a difference. I first enable the Hibernate feature in the OS, which saves the system state. I use some Thunar File Explorer-related changes, and an option to allow non-root users to mount USB devices.
MX Linux tools save time
I've listed the best tools that I use, but there are multiple others that I tinker with a little less frequently. I automate the trash cleaning tasks via the Cleanup tool and edit the desktop widget via Conky, which has multiple views and design choices. Ubuntu and other distros can take a few hints from MX Linux and include these tools rather than forcing users to look for third-party choices or struggle with the terminal.


 English (US) ·