.png)
Remote access tools are nothing new, but few offer the same level of control and reliability that PiKVM brings to the table. With a Raspberry Pi, a bit of DIY effort, and the right accessories, you can build a hardware-based KVM (keyboard, video, mouse) over IP solution that lets you take control of your PC as if you were sitting in front of it. That includes BIOS-level access and rebooting, not just remote desktop sessions after the OS loads. For home office users, tinkerers, or anyone who runs a headless system, it can be a game-changer.
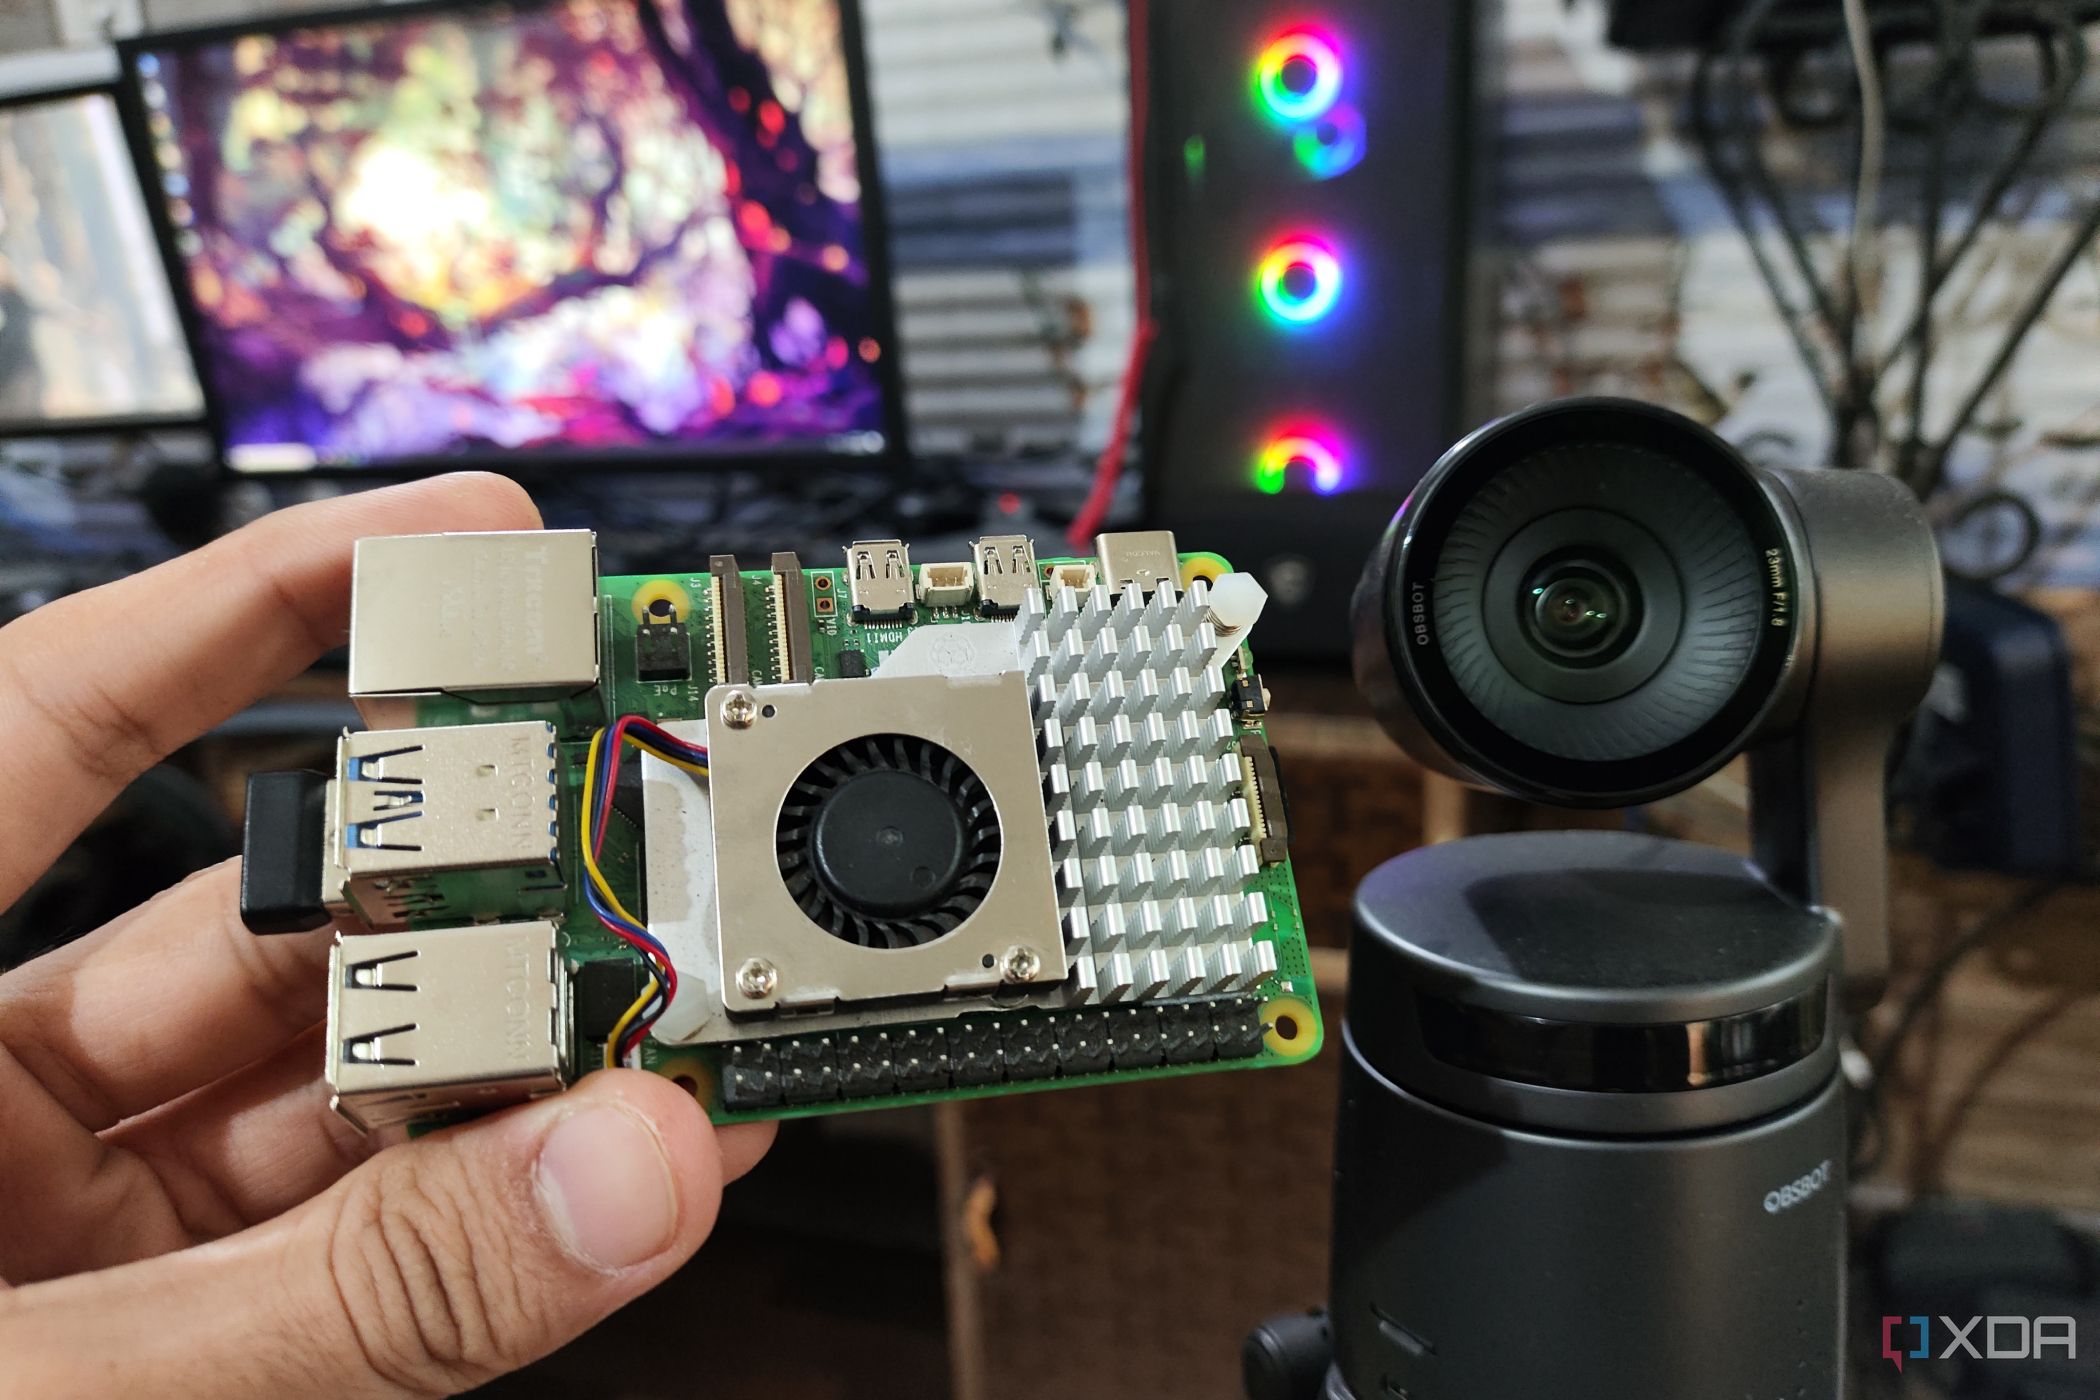
I set mine up using a Raspberry Pi Zero 2 W with an HDMI-to-CSI bridge, and I’ve been surprised at how well it performs. It’s responsive enough for most tasks and gives me reliable remote control without relying on cloud services. The best part is that it runs open-source software and is completely self-hosted. While it’s not the most powerful Pi, using the CSI interface gives it a serious edge in latency and image quality.
Related
10 creative uses for a Raspberry Pi in a home office setup
Your tiny Raspberry Pi can add some essential QoL features to your home office
Why PiKVM stands out from the rest
Full hardware access with no compromises
PiKVM isn’t just another VNC or RDP tool. This is a full-blown KVM-over-IP solution with BIOS access, keyboard and mouse emulation, power control integration, and even the option to mount virtual media. That means I can reboot a machine, jump into the BIOS, flash firmware, or reinstall an OS without touching the physical keyboard or monitor.
Compared to software-based remote access solutions, the difference is night and day. I’ve used TeamViewer, AnyDesk, and native RDP for years, but they’re limited once a machine freezes, crashes, or simply doesn’t boot. PiKVM doesn’t care if the OS is up or not. As long as the target device has power and HDMI out, I’m in control.
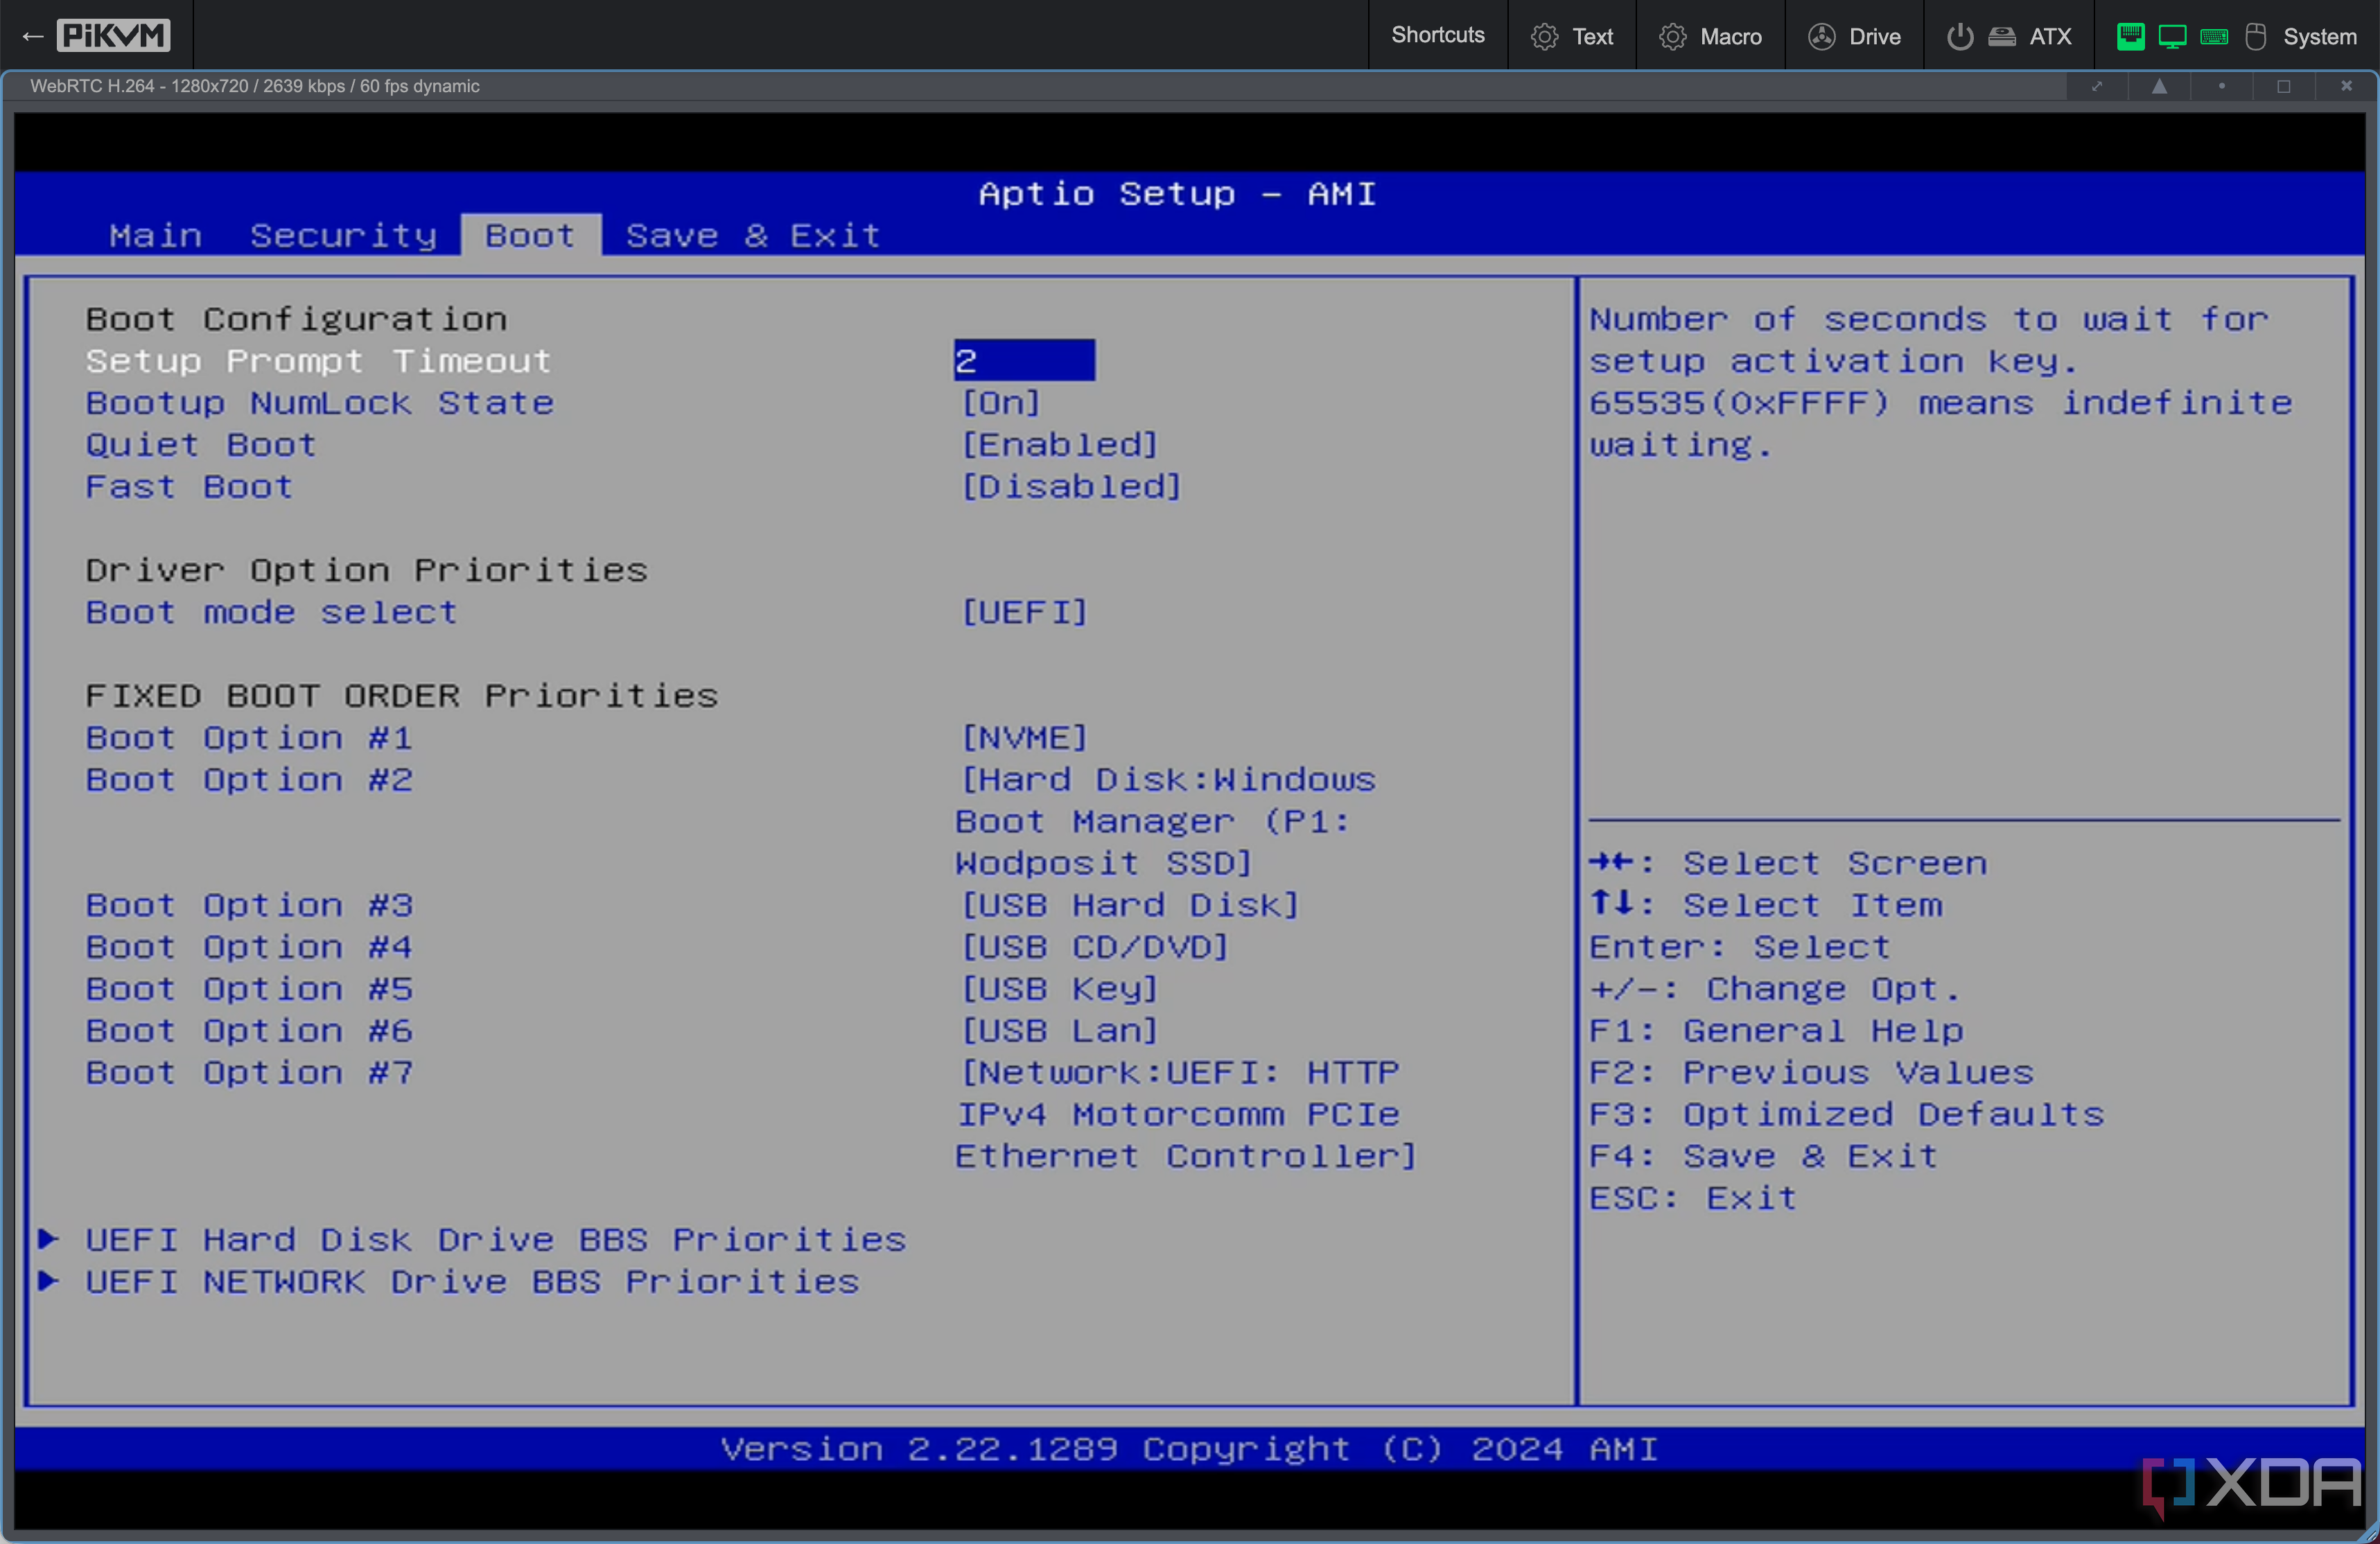
I even used it to install a dual-boot setup on my mini PC, adding Linux Mint alongside Windows. The Live USB installer needed to boot in compatibility mode, but the PiKVM handled it flawlessly. I completed the entire setup—from partitioning to post-install reboots—without ever plugging in a keyboard, mouse, or monitor. Now, I can even choose between Windows and Linux directly from the GRUB menu through the web-based interface.
And because everything runs locally, I don’t need to trust a third party or rely on an internet connection for internal machines. It’s all secure and self-contained within my network.
What you’ll need to build one
Required hardware and software components
Getting PiKVM up and running takes a bit of hardware and configuration work, but it’s not as complicated as it sounds. I used the CSI-based build with the Raspberry Pi 4B and a compatible HDMI-to-CSI bridge. This combo offers lower latency and better video quality than a USB capture dongle, but you’ll still be limited to no better than 1920x1080 resolution at a 50Hz refresh rate or lower.
If you'd rather skip the DIY route, PiKVM does manufacture and sell prebuilt units that include ATX control, faster capture hardware, and a polished enclosure.
You’ll also need a clean microSD card, a USB cable for keyboard/mouse emulation, and a way to power both the Pi and the target device. Most parts are available online, and the official PiKVM site offers compatibility charts for HDMI bridges and power control accessories. If you'd rather skip the DIY route, you can buy prebuilt PiKVM units that include ATX control, faster capture hardware, and a polished enclosure.
Here’s the general process I followed:
Gather the components:
- Raspberry Pi 4B with an official power supply
- HDMI-to-CSI capture board (e.g., TC358743-based)
- USB-C power splitter (I used one by 8086 Consultancy )
- USB-A to USB-A male-to-male cable
- USB-C to USB-C male-to-male cable
- MicroSD card (16GB+)
- Power supply (for Pi and possibly the target machine)
- Optional: custom case or PiKVM HAT
Flash PiKVM OS:
- Download the appropriate image from pikvm.org
- Use Raspberry Pi Imager or BalenaEtcher to flash the image
- Insert the microSD and boot the Pi
Connect everything:
- Connect the HDMI source to the CSI bridge
- Attach the CSI bridge to the Pi’s camera connector
- Connect the USB-C cable from the power splitter to the Pi
- Connect the USB-A cable from the power splitter to the target machine for HID input
- Connect the power supply to the appropriate port on the USB power splitter
- Power everything on
Access the web interface:
Limitations you should be aware of
What you gain vs what you give up
While PiKVM is an excellent tool, there are a few trade-offs when you choose the DIY route. Even with a CSI capture setup, video encoding is handled by the Pi’s limited resources, so you may see occasional frame drops or input lag under load. It’s perfectly usable for BIOS-level access and system recovery, but not ideal for streaming or anything graphics-intensive.
The CSI-based setup is more reliable than USB dongles, but also more finicky when it comes to hardware compatibility and physical installation. The HDMI-CSI bridge requires careful alignment and may need configuration tweaks to work properly. Documentation is available, but expect a bit of trial and error.
If you opt for a DIY build, be prepared to deal with more wiring and fewer features. While you can build ATX power control into the DIY version, it does require more advanced skills. Prebuilt PiKVMs offer ATX power control, GPIO triggers, metal enclosures, and better cooling built in. This can improve reliability and reduce setup hassle. It costs more, but it brings peace of mind if you plan to rely on PiKVM long-term.
Final thoughts on using PiKVM
If you’re managing a home server, running a headless PC, or just want more control over your setup, a PiKVM is absolutely worth your time. It’s an affordable, flexible solution that delivers features normally reserved for enterprise-grade hardware. Because it’s based on a Raspberry Pi and open-source software, it’s easy to build, easy to customize, and doesn’t rely on any cloud connection to function.
The hardware-level access makes PiKVM uniquely useful for recovery tasks, BIOS adjustments, or remote reinstallation. Even with a small board like the Pi Zero 2 W, it gives you reliable control and eliminates guesswork when things go wrong. For anyone serious about their home office setup, this is one addition that genuinely makes a difference.


 English (US) ·