.png)
As I've dove further and further into Home Assistant, I've begun to explore other related tools, too. One such tool I've been playing around with is ESPHome, which inspired me to buy a couple of ESP32 boards, a CYD, and a ton of random sensors. As I deemed my CYD experiment a success, I purchased the XIAO 7.5-inch ePaper Panel from Seeed Studio, as I wanted something battery-powered, long-lasting, and different. My experiment has been a massive success, and it's been an incredibly useful addition to my smart home that's enabled me to work more efficiently.
I picked up two of these particular panels for $60 a piece from Seeed Studios during its mid-year sale, which is actually pretty cheap for what you get. The equivalent display from Waveshare can set you back a similar amount, and that's without the ESP32-C3, the ePaper driver board, or the battery. The XIAO uses the GooDisplay GDEY075T7 panel, and that panel packs an UltraChip 8179 (UC8179) driver IC for controlling it. The driver actually supports tri-color displays (typically black, white, and red), though this particular panel just has black and white.
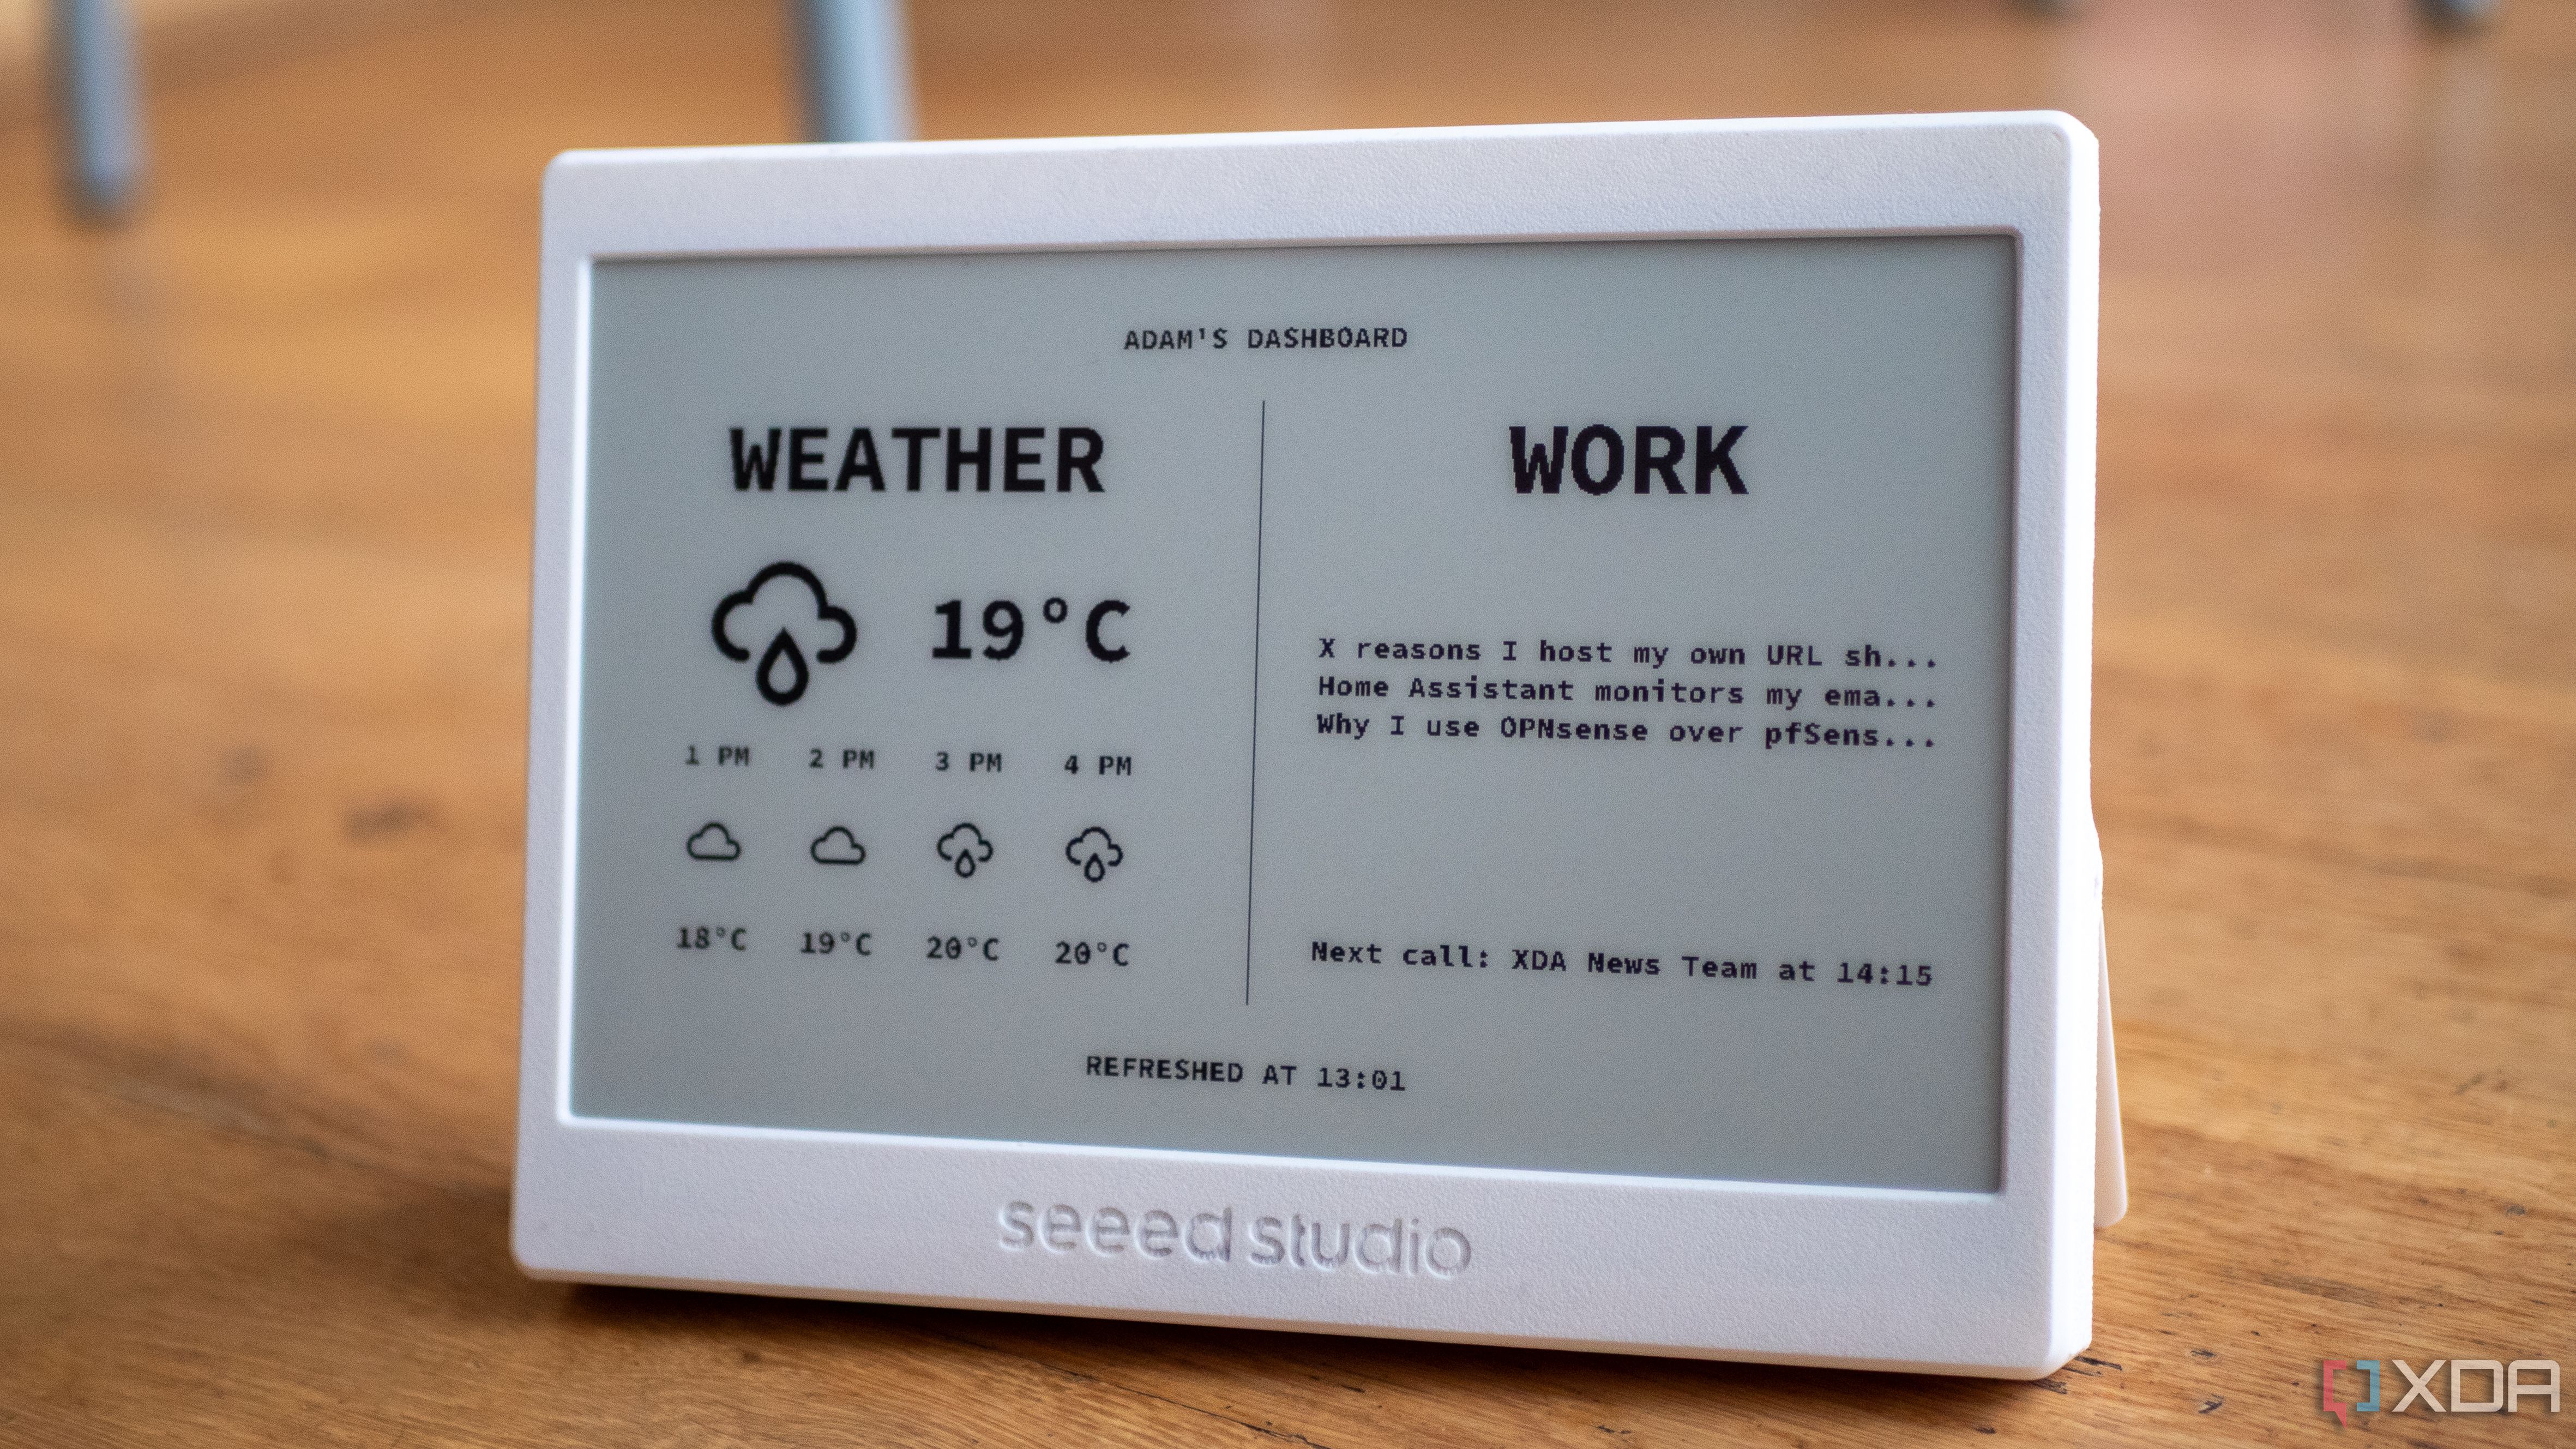
For what you get, this has been a fantastic investment. Not only is it a fully open device that you can control with TRMNL, ESPHome, or Arduino, but every aspect of the product is open. You can buy all the parts separately if you prefer, and Seeed Studio has documented everything you need to build your own equivalent display, while also providing code examples to develop your own software for it. Those examples got me started, and now I have a panel that shows me the weather, my tasks in Asana on a daily basis, and the time of my next call.
If you're curious, I've detailed everything I've done so far with it below, along with code snippets and a link to my GitHub repository containing all of the code that I wrote for it.
Setting up data sources with ESPHome
I learned a lot from GitHub
While I haven't played around with TRMNL yet, and the capabilities of it are intriguing, I've been really enjoying ESPHome and what it can do so far. I plugged in the XIAO panel to my computer, opened the ESPHome Builder in Home Assistant, clicked Add device, and it was picked up immediately. I flashed ESPHome to it, and within just a couple of minutes, I was able to get something basic on the display thanks to the detailed documentation Seeed has provided on its website. I then configured Puppet, a Home Assistant add-on that can screenshot a selected dashboard in selected intervals with parameters to suit it to specific displays. and made the panel retrieve it every couple of minutes. It worked, but it wasn't great.
The problem with an ePaper panel is that when it comes to full refreshes, the entire display will flash temporarily data data is updated and drawn on the screen. What I later learned was that this particular panel supports partial refreshes, so I changed the driver model from "7.50inv2" to "7.50inv2p" in ESPHome and added a new "full_update_every" value, which I've set to 30. This means that sections are only partially updated, and only every 30 draws is a full refresh forced. This is required, as otherwise, ghosting can occur where what was previously in place can still be faintly seen. I may end up reducing how many partial refreshes will trigger a full refresh in the future, as this is a new configuration that I've implemented and may need further tweaking.
What I have now shows me the following information:
- The current weather conditions
- The weather conditions for the next four hours
- My assigned tasks in Asana for the day
- My next call, pulled from Google Calendar
This data is all exposed through Home Assistant, with my Asana tasks and my next Google Calendar call using Home Assistant templates to pull the relevant information. I've since experimented with passing my Asana tasks to an LLM for processing, and then displaying a summarized version of my tasks instead of a list. This has worked quite well, but I'm torn between using the regular list of items and the task summary.
Right now, the display is only updated when new data is received, rather than refreshing frequently. While I did this initially to prevent unnecessary display refreshes (as the entire screen would flash and blink when doing so), it's still a good battery-saving technique, too. Plus, as I have a motion sensor at my desk, I have configured it to only update the display when the motion sensor has also detected movement, as that suggests I'm at my desk and can see the display. If I'm not at my desk, I can't see the display, so there's no point in updating it.
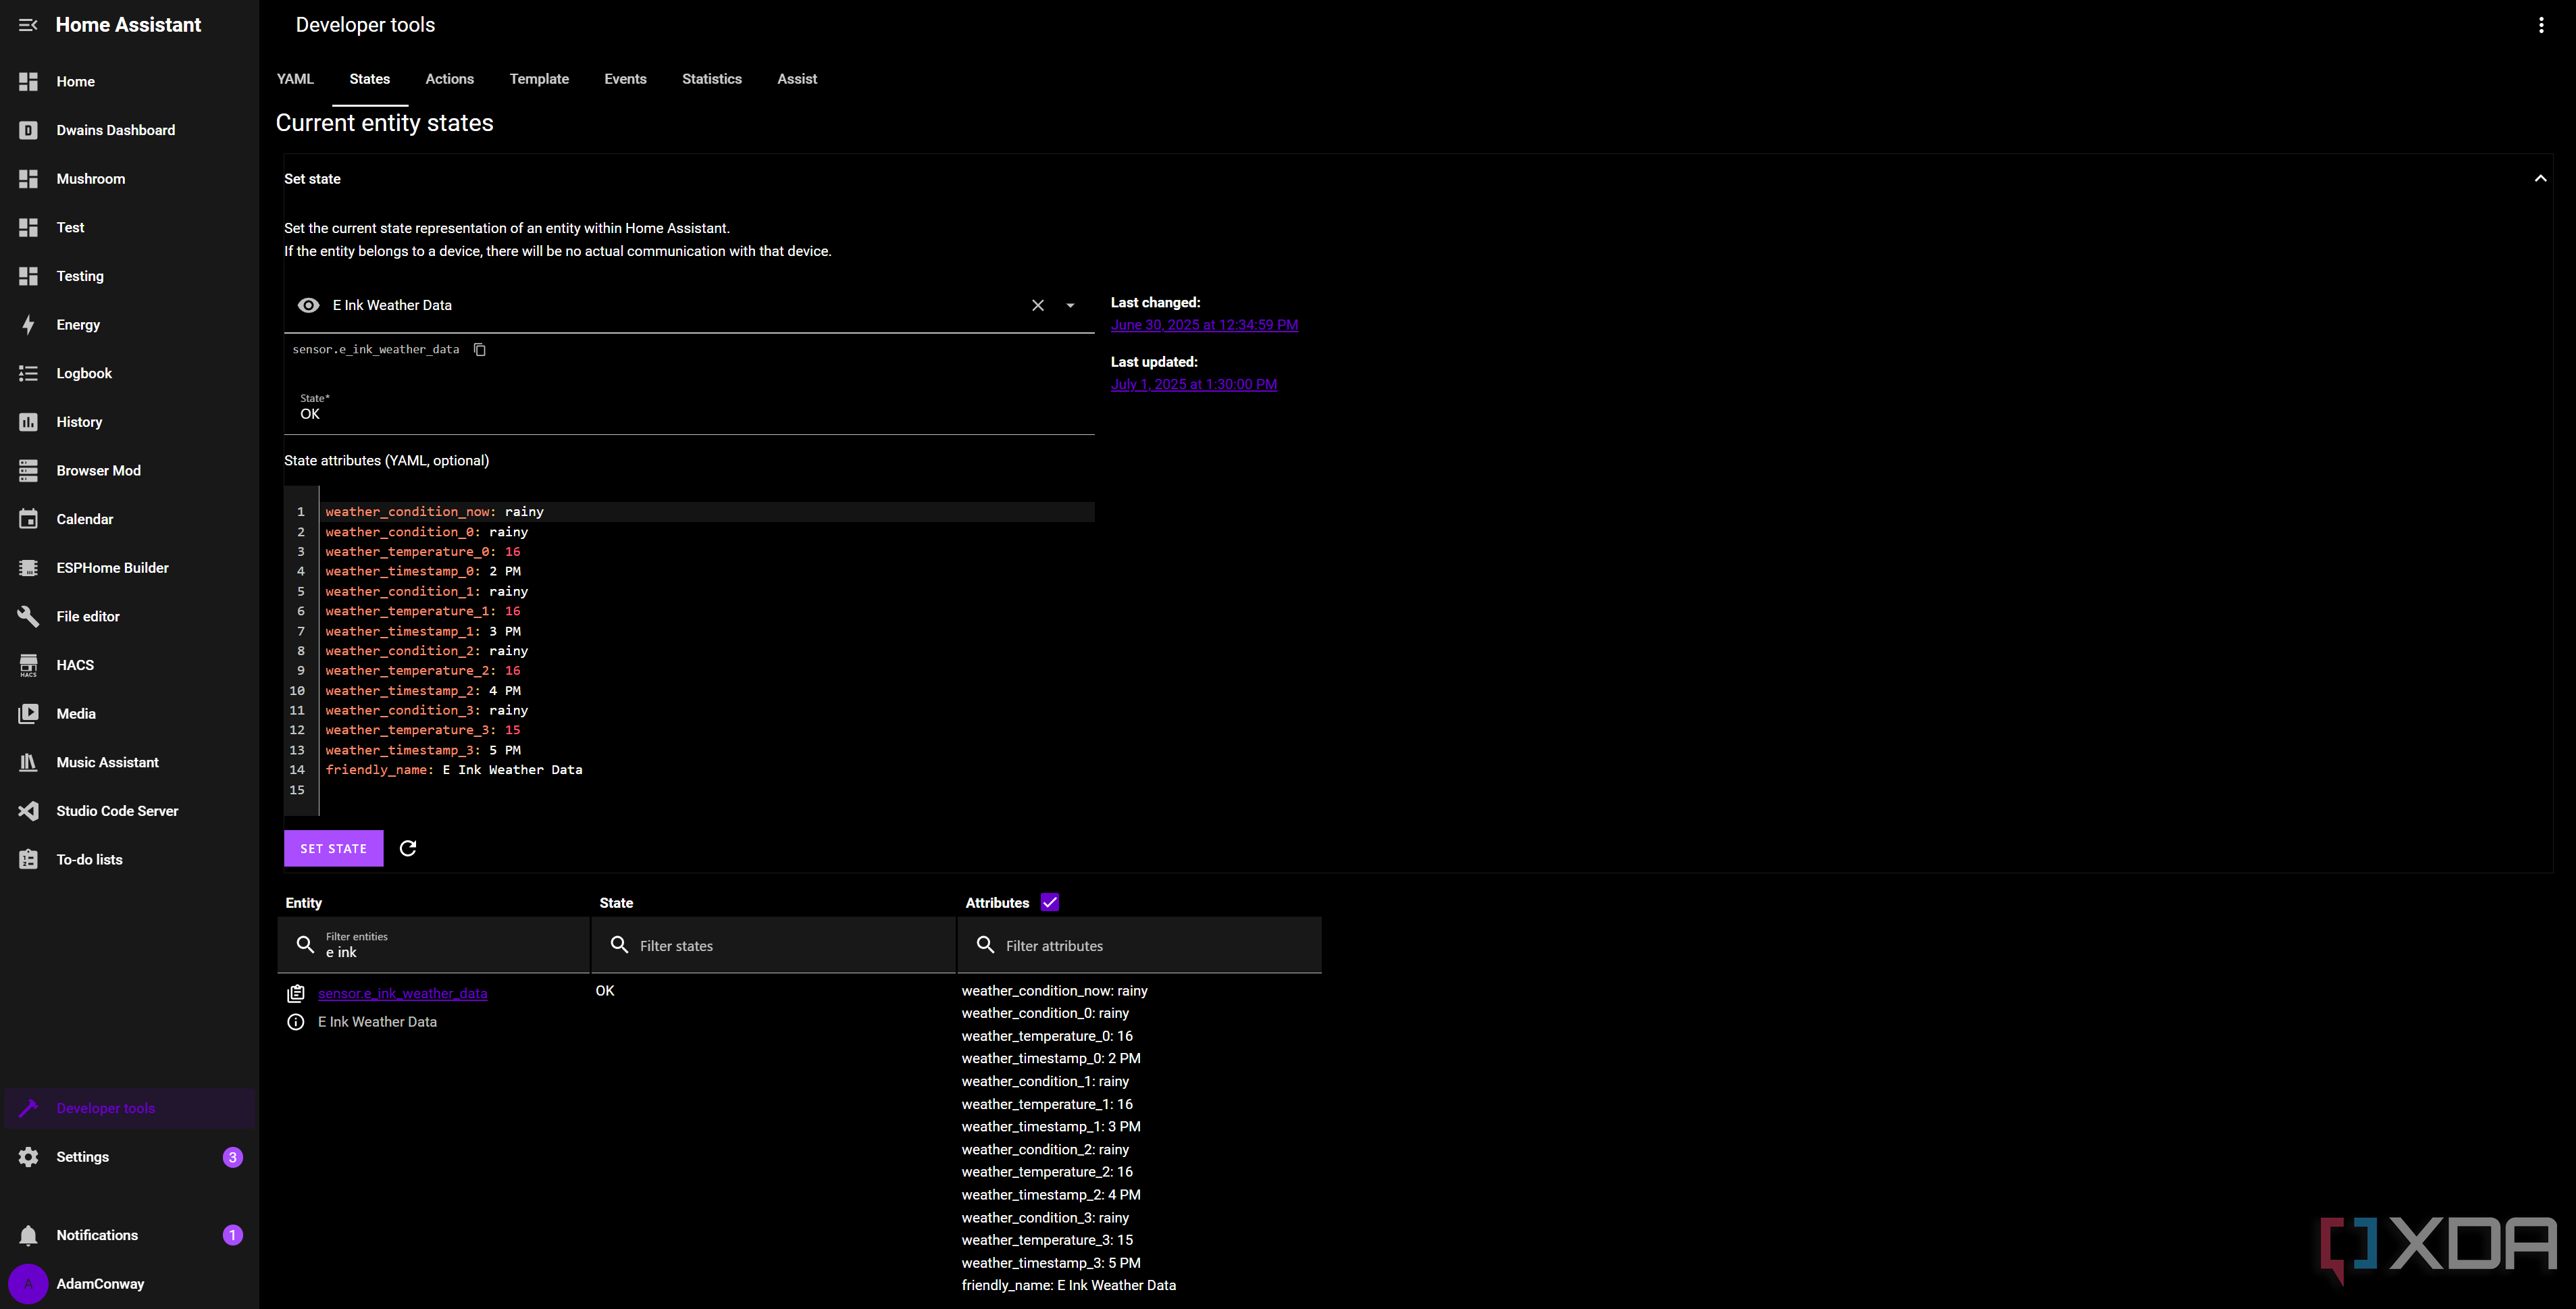
This has been a massive improvement to my workflows, as it helps me keep on task and get a constant reminder of the things I need to do that day, along with what calls I have and the weather conditions for the day. I couldn't have done it without the fantastic Weatherman project I found on GitHub, which got me started on designing the UI and figuring out how to structure the data collected for displaying on the screen. Because I use the Pirate Weather integration for weather updates, my template sensors look like these in Home Assistant instead:
action:- service: weather.get_forecasts
data:
type: hourly
target:
entity_id: weather.pirateweather
response_variable: pw_hourly
sensor:
name: E Ink Weather Data
state: "OK"
attributes:
weather_condition_now: >
{% set cond_now = states('weather.pirateweather') %}
{% if states('sun.sun') == 'below_horizon' %}
{% if cond_now == 'sunny' %} night {% elif cond_now == 'partlycloudy' %} night-partly-cloudy {% else %} {{ cond_now }} {% endif %}
{% else %}
{{ cond_now }}
{% endif %}
weather_condition_0: >
{% set cond0 = pw_hourly['weather.pirateweather'].forecast[1].condition %}
{% set next_set = as_timestamp(state_attr('sun.sun', 'next_setting')) %}
{% set next_rise = as_timestamp(state_attr('sun.sun', 'next_rising')) %}
{% set cond0_time = as_timestamp(pw_hourly['weather.pirateweather'].forecast[1].datetime) %}
{% if cond0_time {% if cond0 == 'sunny' %} night
{% elif cond0 == 'partlycloudy' %} night-partly-cloudy
{% else %} {{ cond0 }}
{% endif %}
{% else %}
{{ cond0 }}
{% endif %}
weather_temperature_0: >
{{ pw_hourly['weather.pirateweather'].forecast[1].temperature | round }}
Essentially, I have a sensor that can be referenced, called sensor.e_ink_weather_data, and all of the different pieces of information are added as attributes to it that can be pulled individually and displayed on the panel. Because this requires using the "get forecast" action in Home Assistant, my template includes a trigger that's activated every 30 minutes, requests the hourly weather data, then uses that response to fill out all of the attributes that I pull for displaying on the screen. The panel uses a local variable called "data_updated", which checks if new data has been received. If it has, it then refreshes the panel. Otherwise, it stays the same.
With this, it's incredibly trivial to have pop-ups appear from other devices, based on the current conditions of my home. I've been experimenting with other variables; for example, when my living room gets too warm, the top left updates to show the living room temperature and a suggestion to open the window. It's a great visual indicator of what's going on at home, and I'll be doing a lot more of that on my second panel once I get around to setting it up and turning it into a smart home dashboard.
Related
I haven't even touched the second panel yet
I'm still not done with the first
I said I bought two of these panels, yet the funny thing is, I haven't even unboxed the second one yet. While I've been playing with this one and configuring it to be a vital part of my workflow, I haven't touched the other one, as I haven't even decided fully on what I want to do with it yet. It's likely going to be a smart display that I'll place beside my Home Assistant Voice Preview Edition, but I'm undecided, and this has been an exercise in UI design and working with data over the network first. Otherwise, I'd be unboxing the other one and having it take up space on my desk before I've even finished with the first.
Still on my to-do list is implementing sleep mode. Seeed Studio says that this particular unit can last for three months at a time on a single charge with a deep sleep mode that wakes it up every six hours, which seems too long for my needs. Still, I like the idea, and deep sleep is configurable. I'm sure if I even changed it to update just once per hour, I'd see an improvement in battery life without compromising on the speed data is shown on the screen. I've also had my unit off a charger for 48 hours now, and while I'm sure it's almost dead (there's no battery sensor, which is a mark against it for sure), it's been doing surprisingly well considering how not only has it been on my desk updating information as it comes in, but I've also been continuously flashing updates to it wirelessly.
I'm also a big fan of the company behind this device, and it's worth highlighting the efforts Seeed Studio has gone to when it comes to supporting the open-source community. The company has published detailed write-ups, code examples, and documentation while also offering reasonably priced devices. I'm always happy to support a company that's working to give back to the community, and offering up the parts list and full 3D schematics for those with a 3D printer to build their own case for devices like these is not something every company does.
If you're interested in looking at my code and how I developed for this particular panel, I've put all of the code on GitHub.


 English (US) ·