.png)
I recently picked up an ESP32-powered Cheap Yellow Display, otherwise known as a CYD. For about $20, you get an ESP32 hooked up to a screen, with an SD card slot and some exposed GPIO pins for your own additions. While ESPHome has some decent tools built in for creating a UI, it added support for the Light and Versatile Graphics Library a few months ago, otherwise known as LVGL. This is a graphics library filled with prebuilt widgets, and it looks a lot nicer than anything I could create in ESPHome.
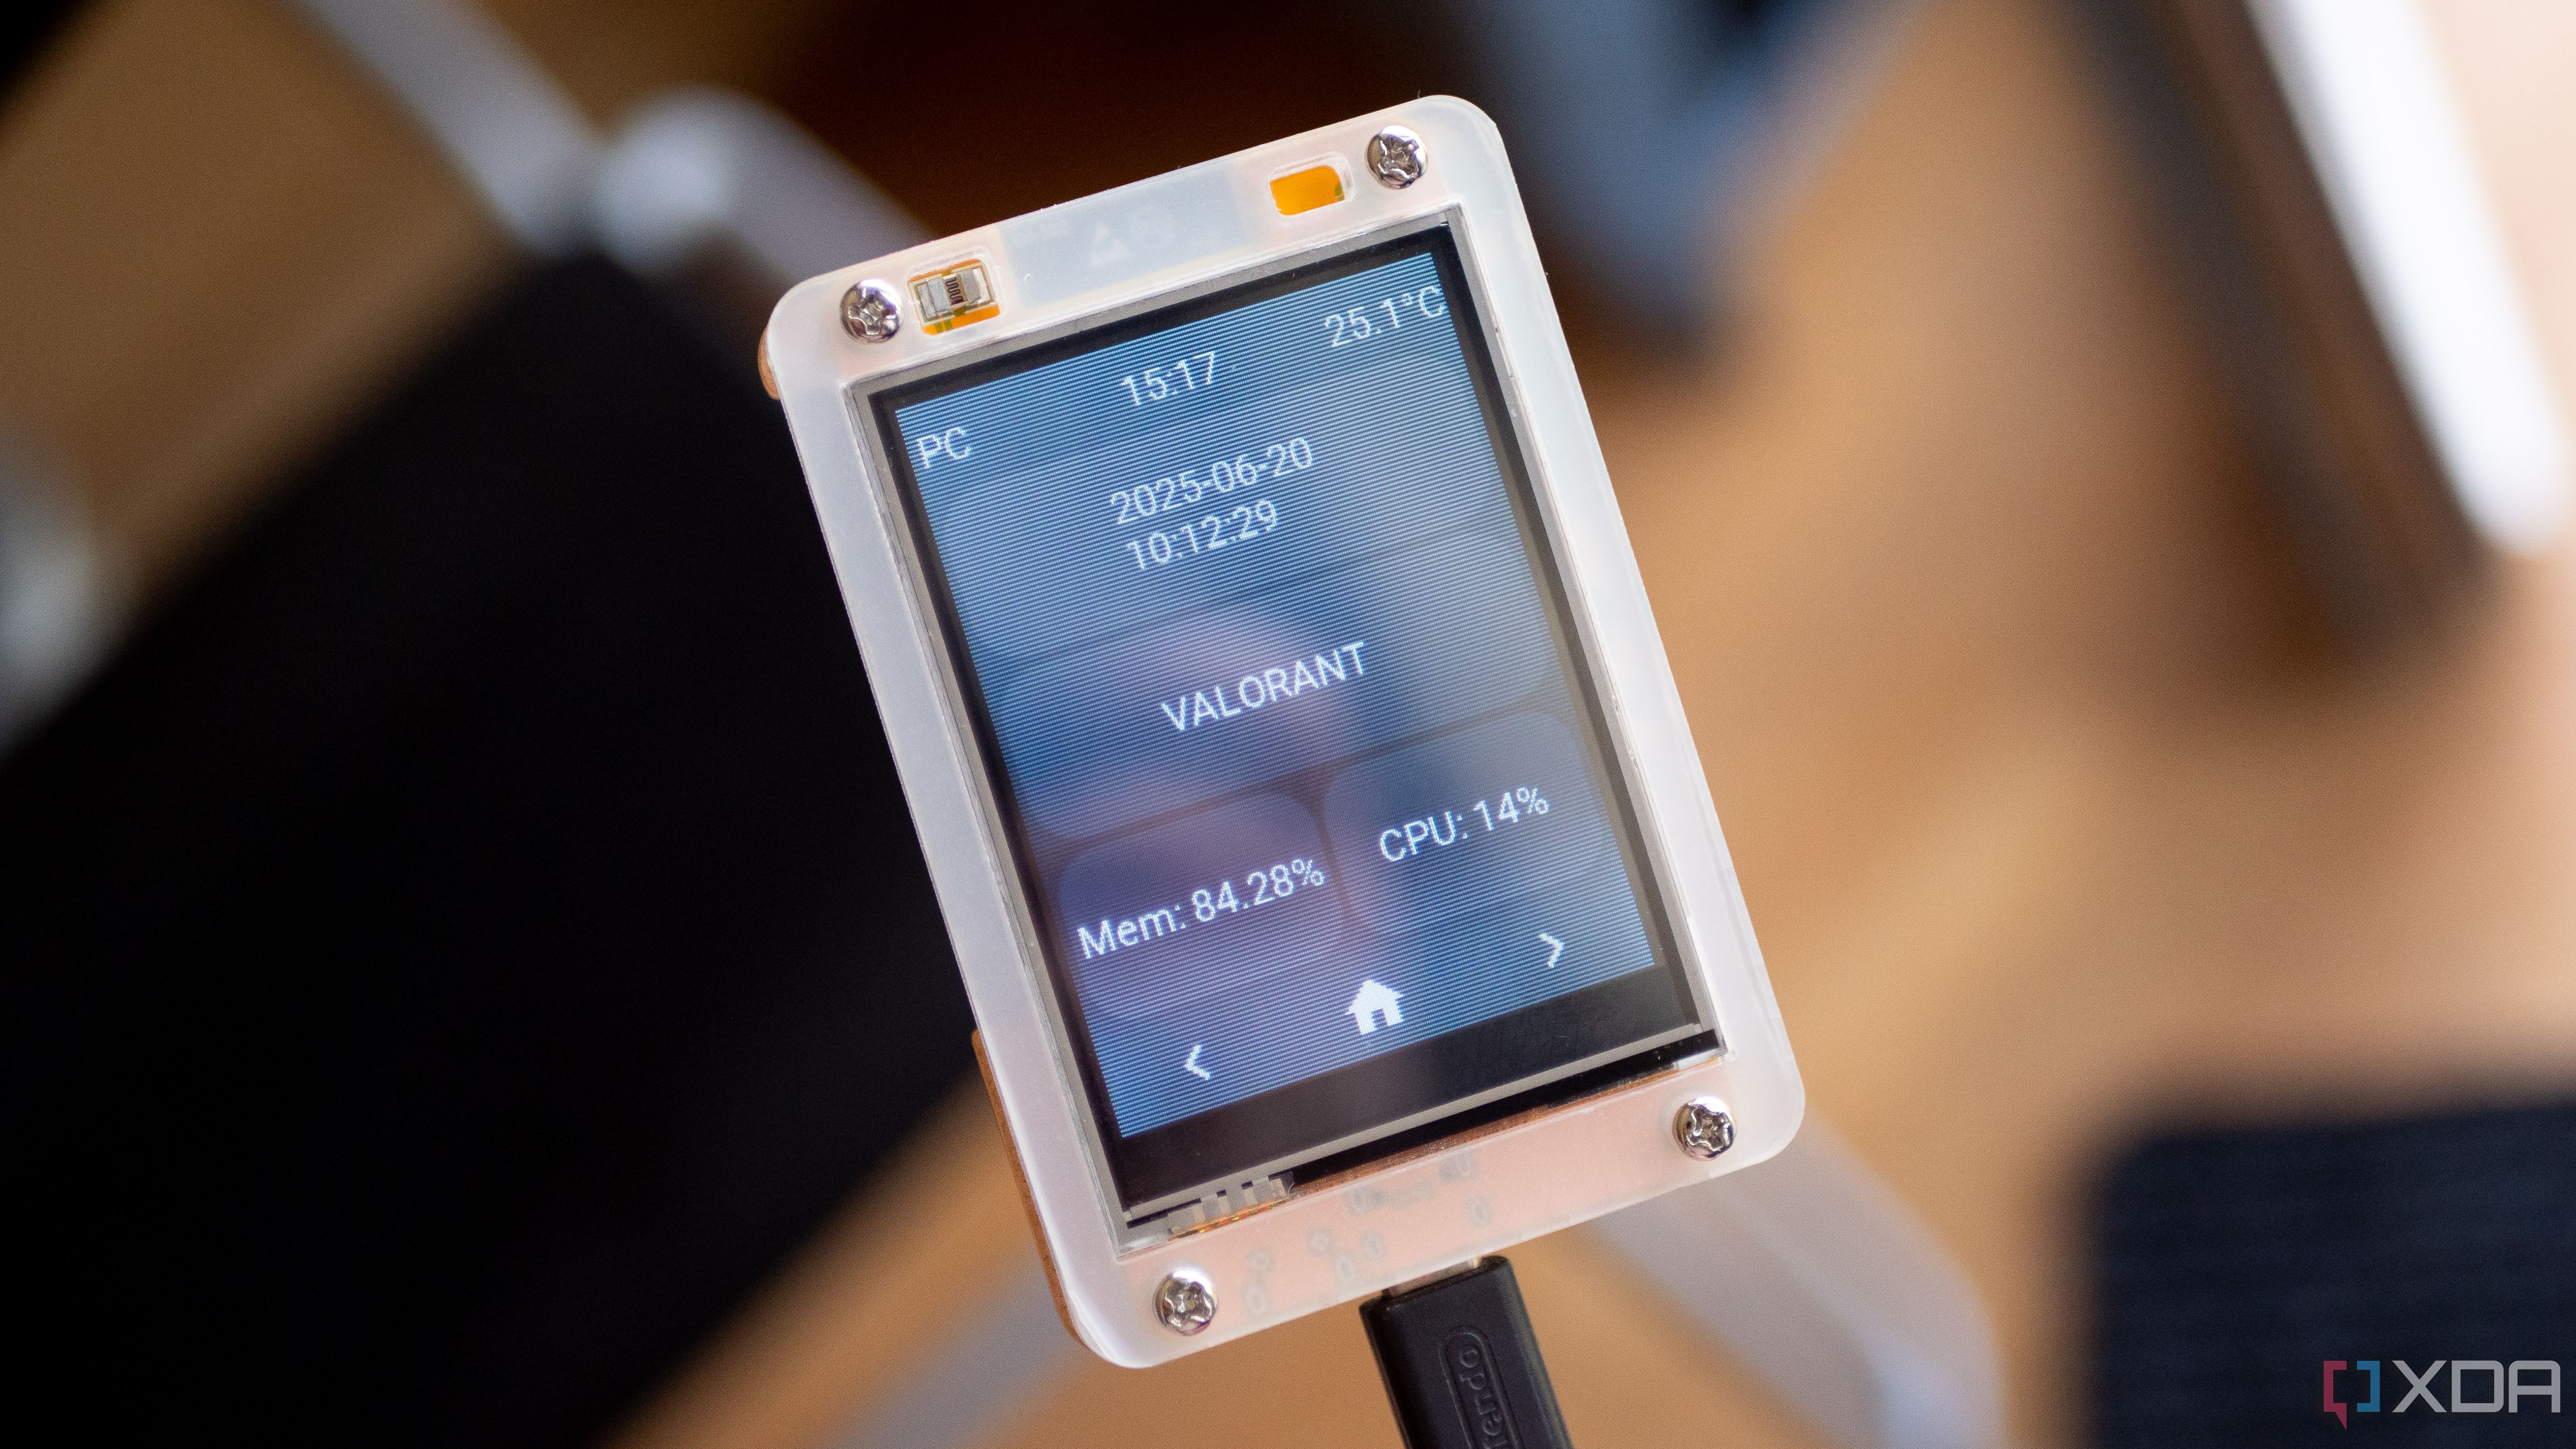
I've been building a dashboard for local home controls using LVGL, and what started as something that could give me control over the lights in my home and control my media playback has now turned into a PC monitoring dashboard on top of all of that. It sits on my desk anyway, where my PC is, so it only made sense. Now, I can see my last boot time, my currently active window, my memory usage, and my CPU usage, all on this display.
Of course, the currently active window isn't all too useful given that my PC is right in front of me, but this is merely a proof of concept, showing what kind of data you can pull. It doesn't make sense to use it in this context for me, but you, the reader, may have a reason you'd like to pull the currently active window on your PC and show it on a dashboard. Plus, it requires a slightly different way to display the data than some other sensors, so it's a way to demonstrate another way of showing text on the screen.
For this, I'm using HASS.Agent on Windows to send the data to an MQTT server, alongside ESPHome as an add-on in Home Assistant. Once combined, the data goes from my PC to my MQTT server, to Home Assistant, and then to my CYD. It's pretty neat, and the possibilities seem genuinely endless when it comes to Home Assistant and ESPHome.
Related
How code snippets in ESPHome work
And how to implement our first button
To get this up and running, we'll assume you already have HASS.Agent installed, connected to an MQTT broker, and you have ESPHome installed as an add-on to Home Assistant. If you're using Home Assistant Container (rather than HAOS), you can install ESPHome as a separate container, with the ESPHome integration installed in Home Assistant to link everything up.
The base of this project uses Ryan Ewen's ESPHome LVGL project on GitHub. This project has proved invaluable to learning LVGL and has helped me significantly throughout the development process of this dashboard. I've already incorporated light controls and media controls, and the next step was to take in data from Home Assistant and display it in cards like above. These metrics are displayed on a separate page, and I can use the arrow keys at the bottom to move left and right between them.
For reading the last start time, I first create a text sensor in ESPHome that reads the "lastboot" sensor from my MQTT entity. It looks like this, though, ensure that you use proper indentation:
- platform: homeassistantid: pc_last_boot_raw
entity_id: sensor.desktop_73d9nef_lastboot
internal: true
on_value:
then:
- lvgl.widget.refresh: pc_last_boot_raw_on
It's fairly self-explanatory, except for the "lvgl.widget.refresh" part. This is done because the display will draw the elements before they're provided actual values, as it boots quicker and displays the home screen quicker than it can connect to my network. That part ensures that it refreshes the "pc_last_boot_raw_on" widget, which I'll explain next.
widgets:- button:
width: 232
height: 75
widgets:
- label:
id: pc_last_boot_raw_on
text: !lambda |-
if (id(pc_last_boot_raw).state.length() return std::string("");
std::string ts = id(pc_last_boot_raw).state;
std::string date = ts.substr(0, 10);
std::string time = ts.substr(11, 8);
return date + "\n" + time;
text_font: roboto_md
align: CENTER
- label:
id: pc_last_boot_raw_off
text: "PC off"
text_font: roboto_md
align: BOTTOM_LEFT
hidden: true
The above might be hard to follow, so I'll explain how it works from start to finish. The "width" and the "height" are taken from Ewen's 320x240 button widgets, as these are already calculated to fit a "wide button" on this display, allowing for three rows of buttons. Next, we create a nested widget containing two separate labels: pc_last_boot_raw_on and pc_last_boot_raw_off. I have not properly incorporated the logic for the latter (and "hidden: true" hides it from the display), but I'll explain what it does after explaining pc_last_boot_raw_on.
In pc_last_boot_raw_on, we use a "!lambda" to process the text from the text_sensor. While ESPHome configurations are written in YAML, lambdas tell ESPHome that the next block of text is C++ code. This is also why we use a "|-", as it tells ESPHome to treat the next indented block as plaintext. Lambdas are very powerful in ESPHome, as you can configure everything you want with a YAML syntax, and then inject C++ code inside specific blocks to customize their behavior or dynamically change elements.
This lambda checks if the length of the block is shorter than 19 characters. This is a bit of a hacky move and one that I could tweak better, but HASS.Agent reports the boot time in a format of 2025-06-20T10:12:29, which is 19 characters. We are basically sanity checking the response to ensure that it matches the length of the expected result. It would be better to change the state outside of the block and react accordingly, but this works and sets the block to "" if we receive an unexpected value, keeping it blank.
However, if it passes, we copy the value of the text_sensor (the "state") to an internal temporary string, called ts. In C++ (and in C), a string is a dynamic array of characters, so we can copy array elements to another string (by creating a substring) to recreate portions that we want to keep. We also know, because the string will always be a standard length, the positions of the characters we want in all cases. We use the "substr" method to create a substring, telling it to start from position 0 and gather the next 10 characters to save to our date string. We do the same to pull the time, telling substring to start at position 11 (skipping the "T" in the string) and gather the next 8 characters to save to our time string.
Finally, we return:
date + "\n" + time"\n" is a newline character, and we separate date and time without quotes because those variables already represent strings. Quotation marks denote a string that you're entering in code, so the above essentially says "get the variable from date, append a newline character to it, then append the variable from time to the overall string."
Because all of this is inside the "text" block, ESPHome essentially creates the button with information that says, "create this button, set the 'text' value that the button requires to the output of whatever this code does." This way, we can dynamically display text, rather than needing to statically set values or try to dynamically set values from outside of where they're initially created.
But what about "lvgl.widget.refresh: pc_last_boot_raw_on"? We've labelled the button "pc_last_boot_raw_on", so we basically redraw the button if a new value is received. This allows it to update after boot, and works well with the other sensors that we'll talk about next.
The boot date and time sensor is the most complicated sensor of all of them, so if you've followed along, it's going to get a lot easier.
Configuring RAM, CPU, and active window
These are easier

We define the text_sensors in ESPHome to pull from Home Assistant in the exact same way we did to pull the boot date and time, so you can just modify that text_sensor to fetch the other variables that you need. Once you've created one for your RAM, CPU, and active window (referencing the correct entities), we can move on to creating our buttons.
- button:width: 114
height: 75
widgets:
- label:
id: pc_mem_on
text: !lambda |-
std::string mem = id(pc_mem_raw).state;
return "Mem: " + mem + "%";
text_font: roboto_md
align: CENTER
- label:
id: pc_mem_off
text: "PC off"
text_font: roboto_md
align: BOTTOM_LEFT
hidden: true
We've already been over most of this, with the only changes outside of the lambda block being the width of the button to allow for two buttons in a row. In our lambda, we simply copy the value of pc_mem_raw to our "mem" variable. Finally, we return "Mem: %". You can see how the syntax of our return works, and note the space after the colon. It will return exactly what you give it, so if you didn't put the space inside of the quotation, it would stick the value of mem directly beside the colon character.
We can repeat the same for the CPU and active window, though the active window is just a regular return without any string concatenation. The active window in my example is also a wider button like our boot time button.
Related
ESPHome is incredibly powerful
You can do anything

I'm still learning how to use ESPHome, and libraries like LVGL are totally new to me. This may not be the best way to achieve what I've built, but it works, and I can iterate and improve on it in the future. What ESPHome has enabled me to build with ease, from my browser, with updates that can be sent wirelessly, is nothing short of fantastic, and I'm blown away by how seamless the entire experience is.
Of course, there are other ways to send monitoring data to Home Assistant as well, but I already use HASS.Agent, and the data that I receive here is enough to display a working prototype of the kind of data I can collect and display. If you set this up and then decide you want to change the source of your data, you just need to change the text_sensor to pull from the new entity. You don't need to overhaul the entire thing, unless the format of the data changes significantly to impact your lambdas.
If you have some ESP32 devices lying around, you can start using ESPHome right away. Hook it up to your PC, open the ESPHome device builder, and hit install. It'll push a basic, default setup that will connect the ESP32 to your Wi-Fi and enable OTA updates. From there, you can do whatever you want, and these little devices can do anything from displaying genuinely useful information to enabling you to slap your desk to turn on your PC. It's fun and you'll learn a lot.


 English (US) ·