.png)

Sign in to your XDA account
As I've begun to play around with ESP32-powered displays like the Cheap Yellow Display (CYD) and the WT32-SC01 Plus, I've mainly been focusing on utilizing ESPHome to do everything. It's what I started with, yet it's not the only option. Another, similar tool that others make use of is openHASP, which is a purpose-built tool specifically for building an interactive touchscreen interface. ESPHome can do it all, but openHASP is fairly narrow in its focus. I decided to give openHASP a try and see how it fares, and to be honest, I'm pretty impressed.
Of course, there's a learning curve to these things, especially when you're used to ESPHome. For example, I was somewhat confused when it came to installing openHASP on the CYD, only to learn that it's only supported in the 0.7 development build of openHASP. Plus, while I realized it fairly quickly, I didn't see any documentation on the site that said to navigate to the local IP address of the device to upload my configuration. I'm very used to the ESPHome way of doing things, and it took a bit of fumbling about to get started with development.
With all of that said, I've since set up a basic user interface for controlling my light and pulling a temperature sensor, and it works really well. Once you get past the initial hurdle of figuring out how it ticks, getting started with the development of things is quick and easy, and I actually really like how openHASP handles a lot of its UI development. Plus, the usage of MQTT is a neat way to communicate between Home Assistant and your device, and given that many people with Home Assistant likely already use it, it makes a lot of sense.
Setting up openHASP
A web-based installer
openHASP has some similarities to ESPHome, which I greatly appreciate, though mostly on a conceptual level. There's no need to set up a local developer environment if you don't want to, and everything can be done from your browser. From flashing openHASP to modifying the actual board configuration, or adjusting your own code on the device, everything is done from the browser. It's pretty neat, and while the process is quite different from ESPHome in general, the browser being the primary source of entry is a big deal for ease of entry.
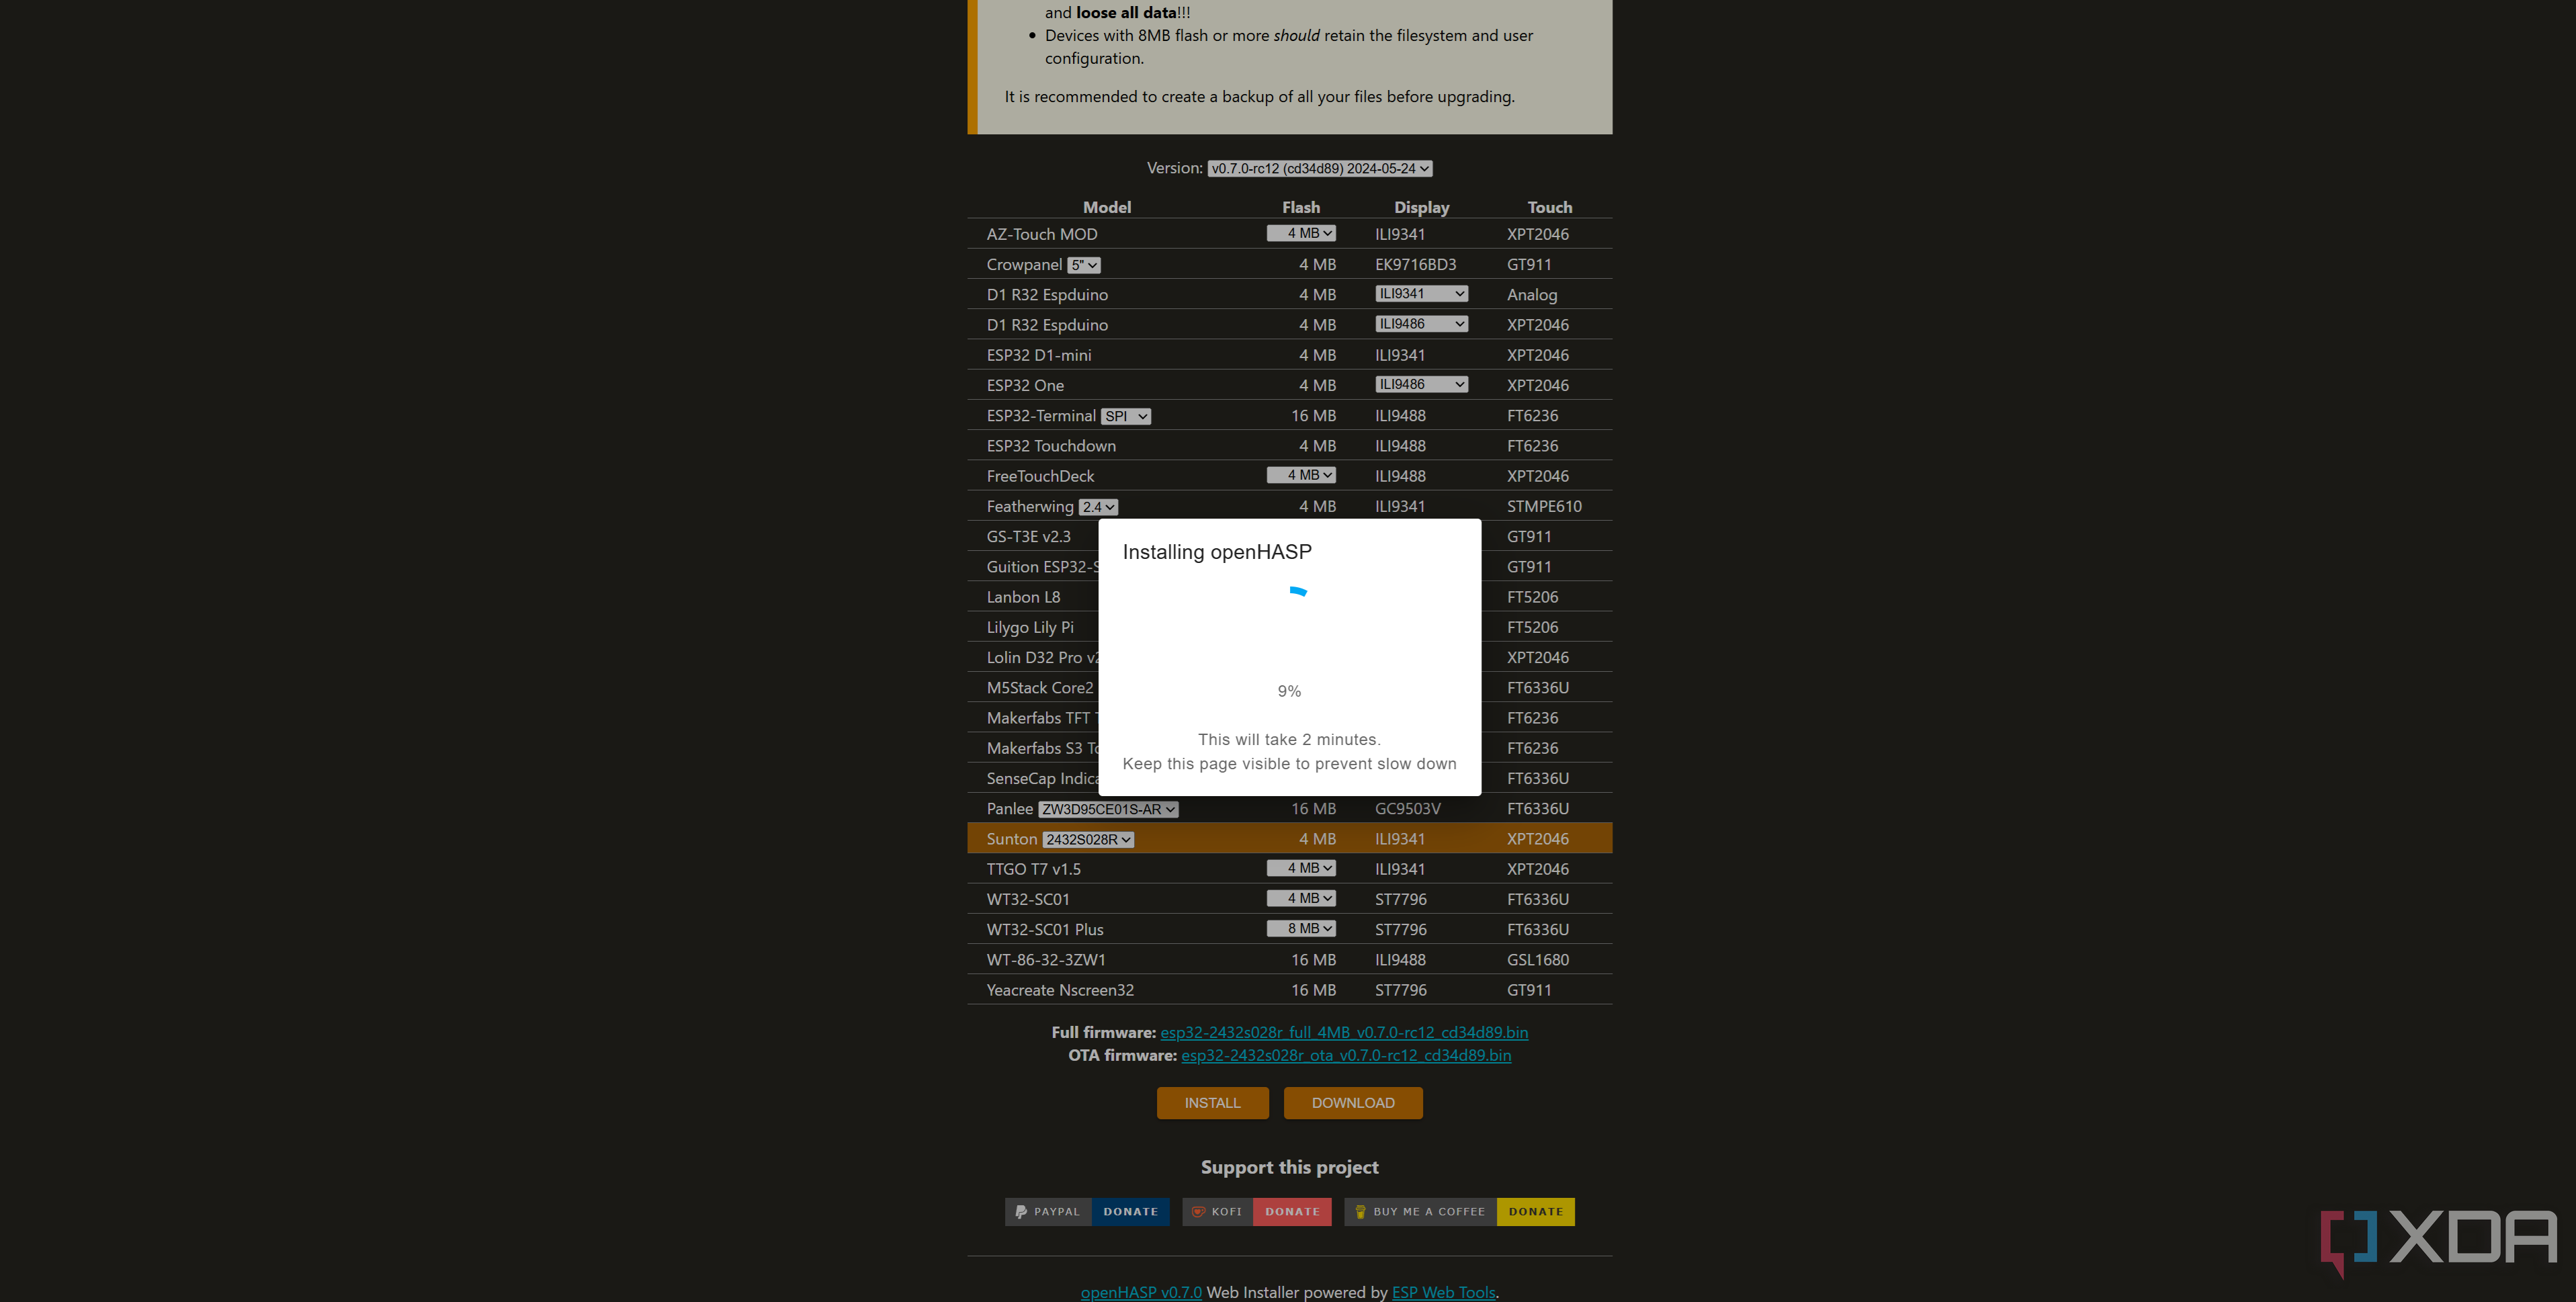
Setting up openHASP on your device of choice first requires heading over to the web installer in a Chromium-based browser. Here, you can select your board, the flash storage (if it varies), and then either download the binary file or flash it directly from your browser. More boards are supported in the nightly version of the web installer, such as the CYD, so check that out too if yours isn't there on the regular web installer. Once you've got everything right, click install, and let it run.
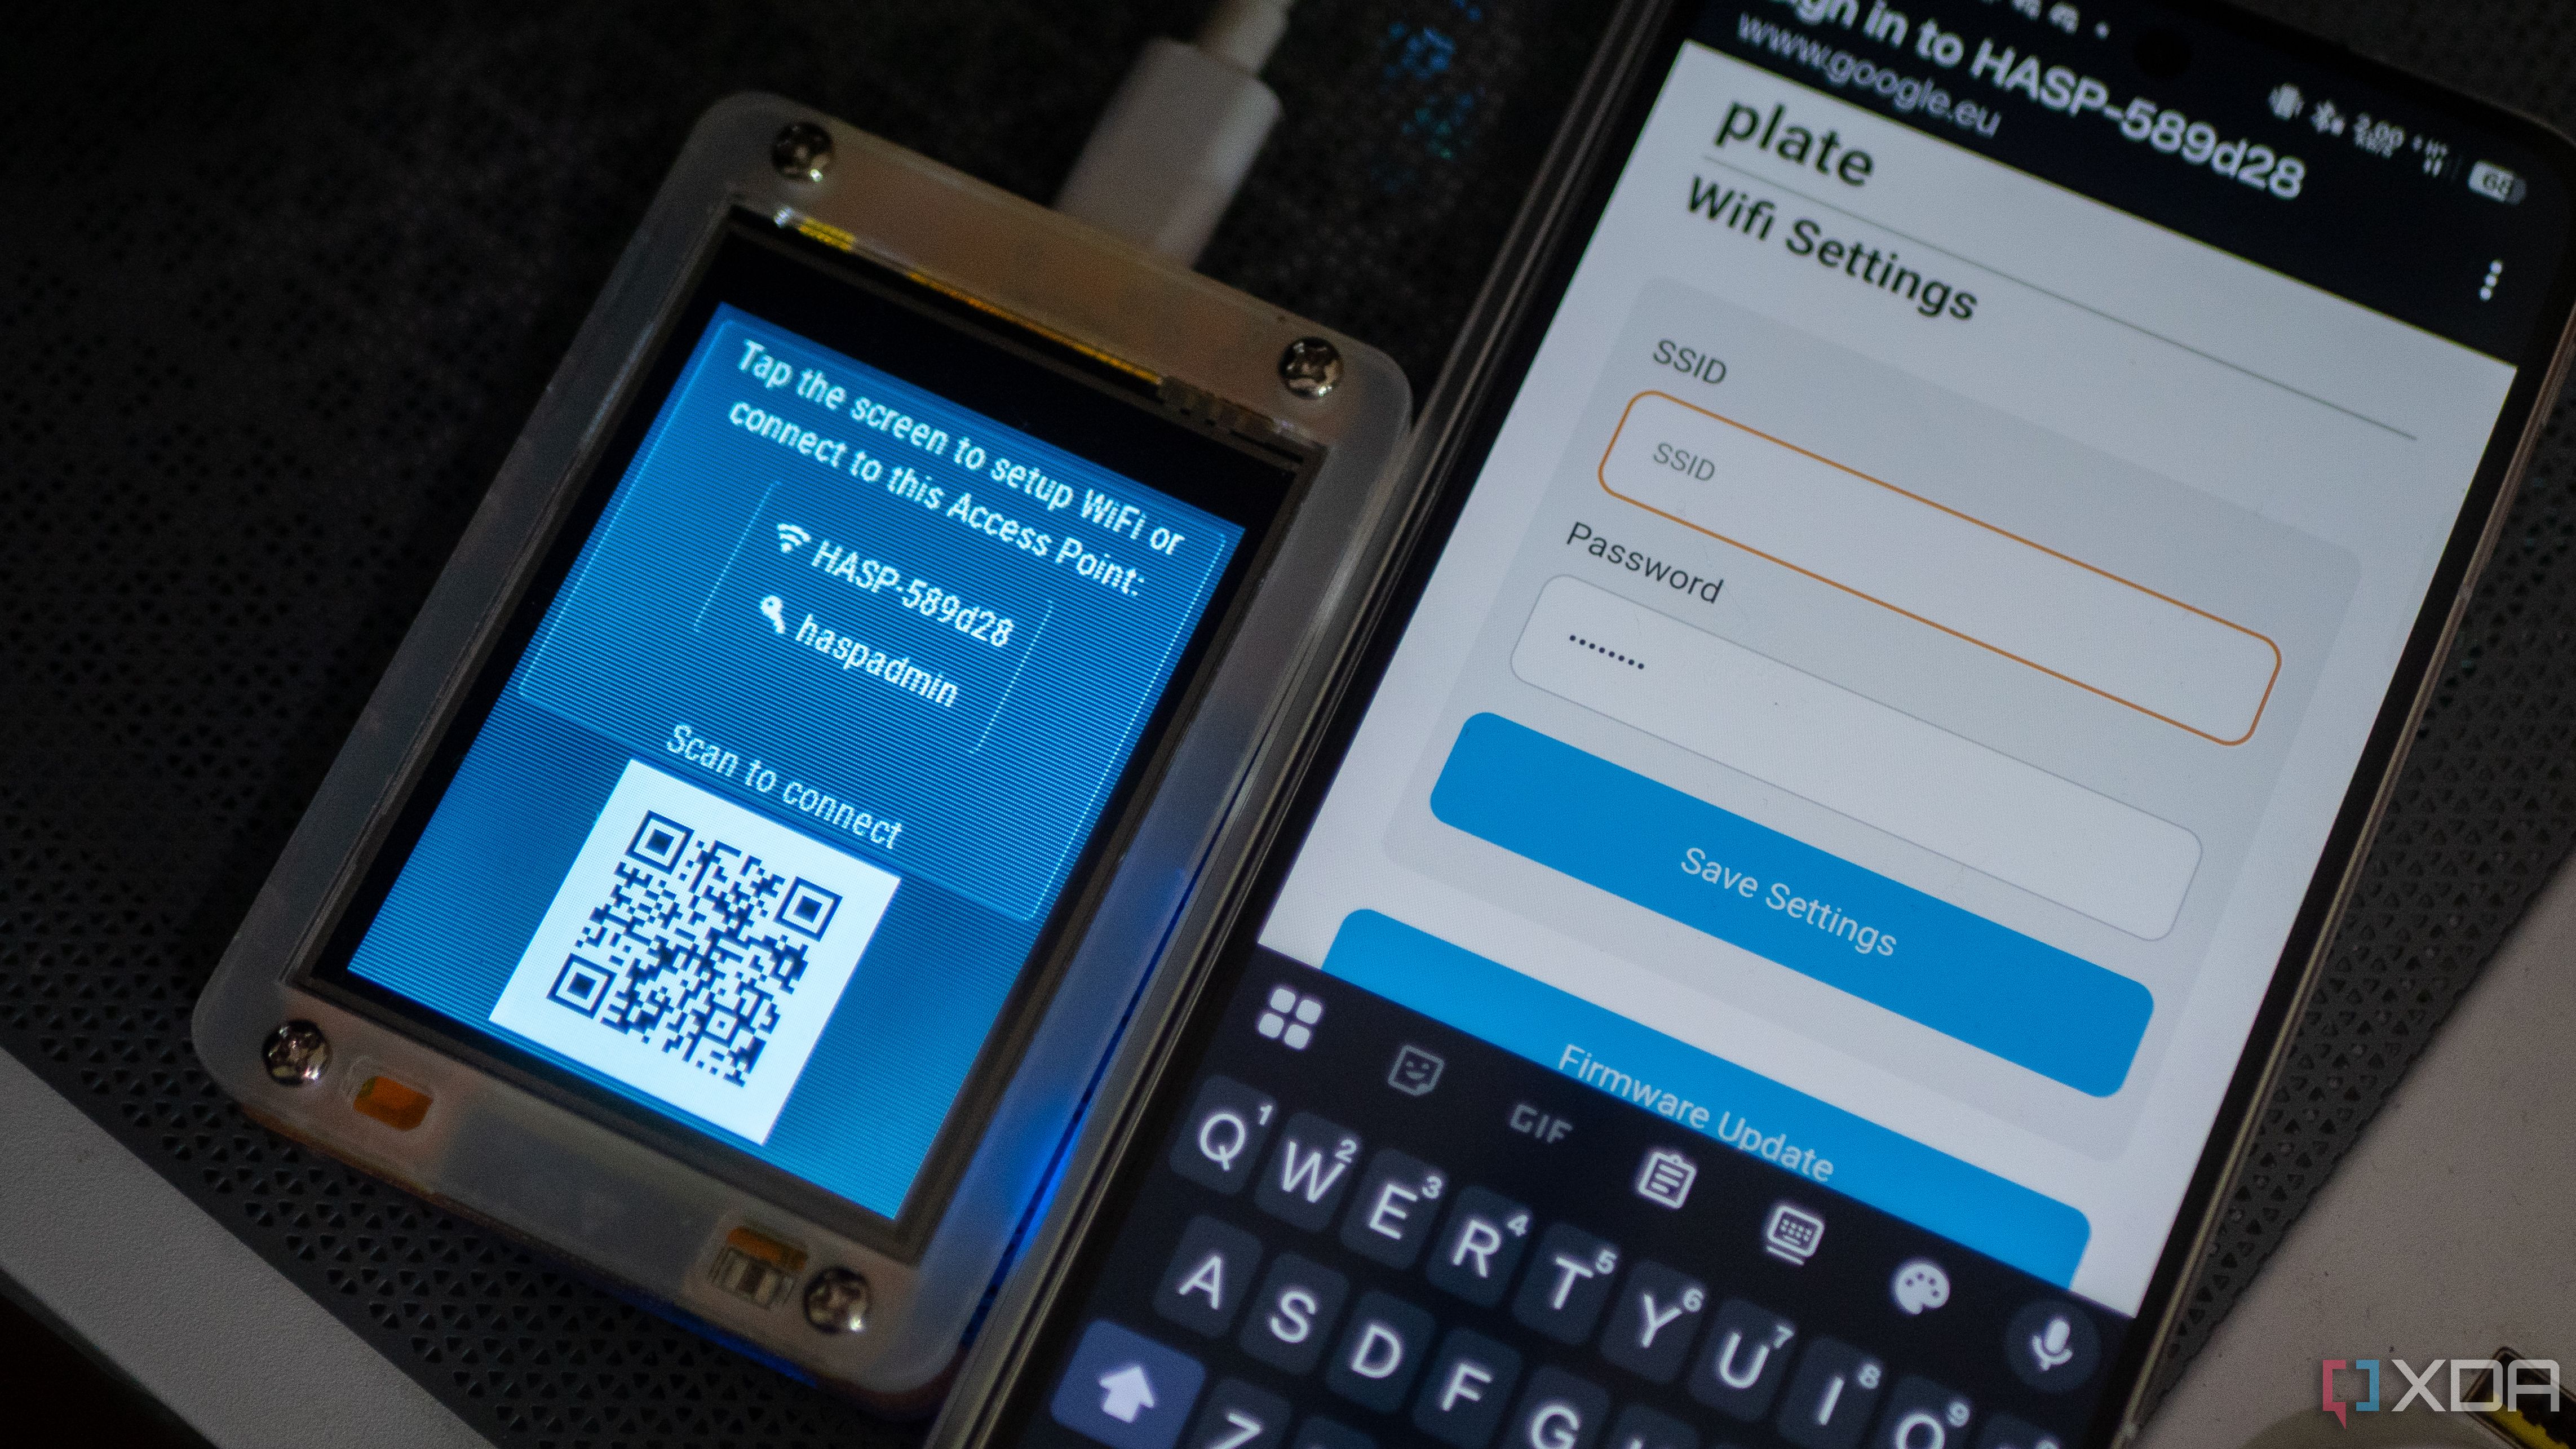
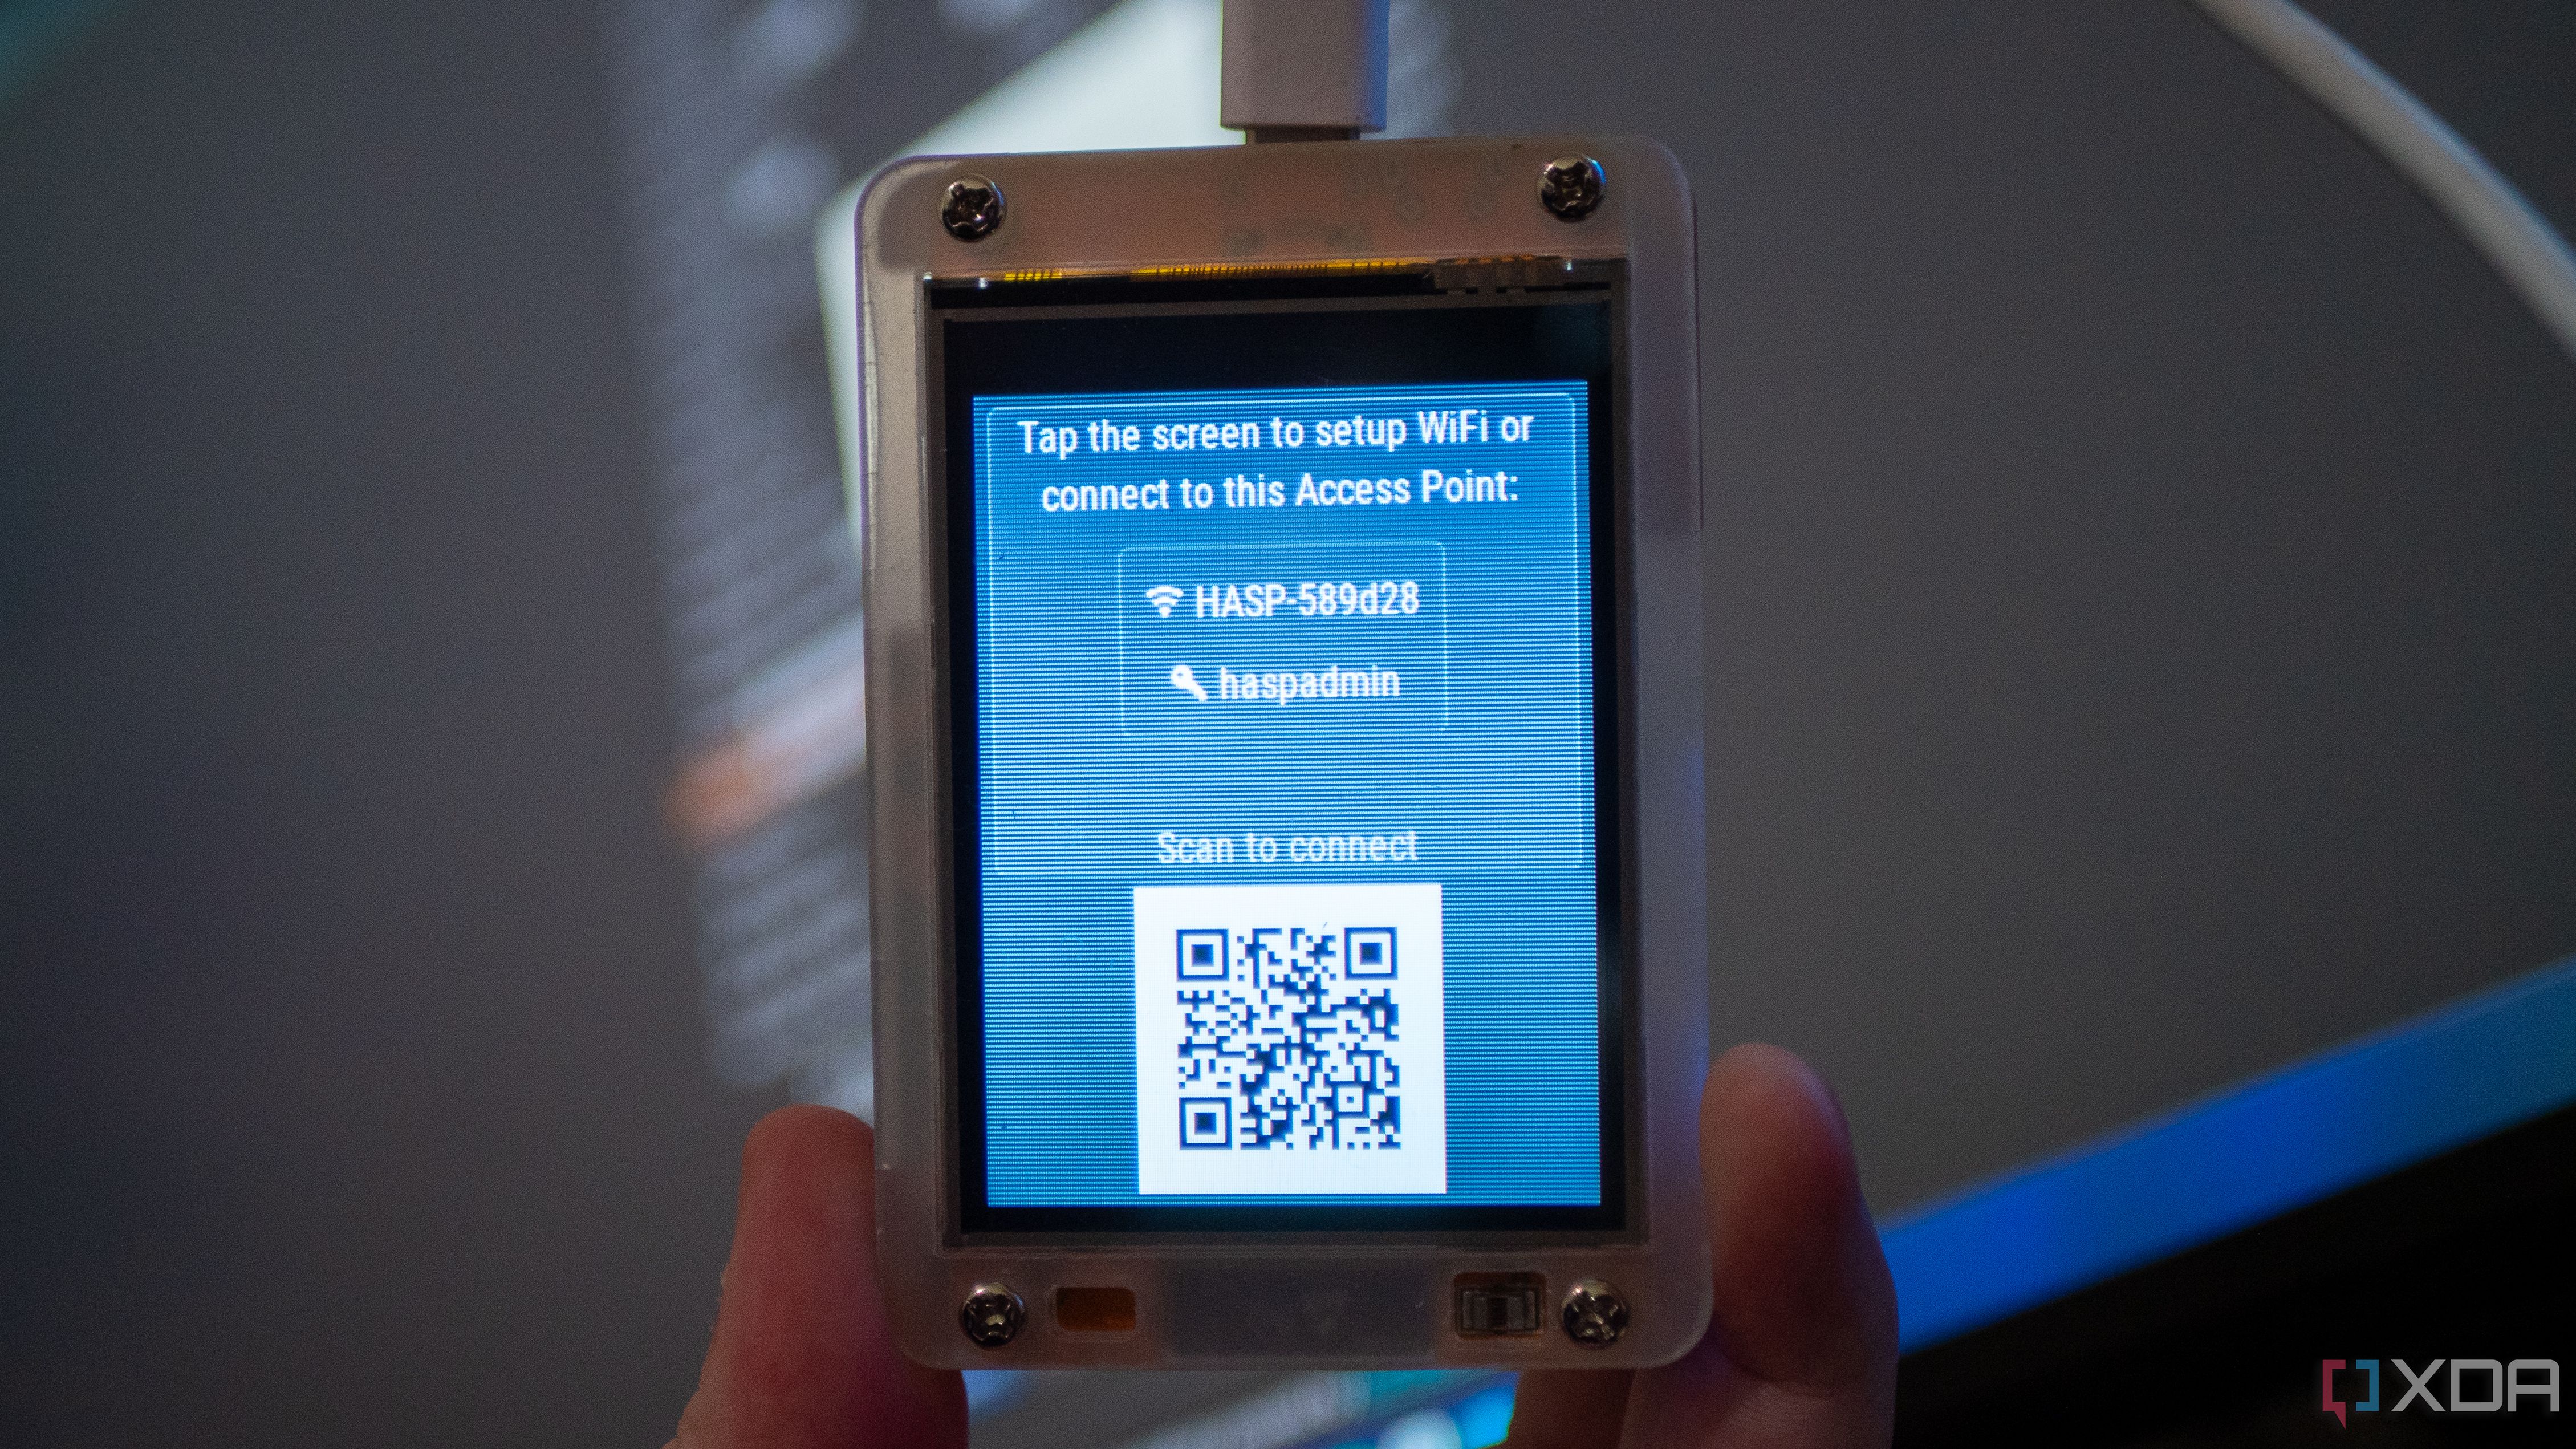
Keep in mind that the installation process can take a couple of minutes. When it finishes, your device should reboot and display a QR code alongside an SSID and a password. This is the gateway to setting up your display and getting it connected to the network. While the official documentation says to tap the screen and a calibration option should come up so that you can manually enter an SSID and password from the display itself, this didn't work for me. It may be related to the fact that support for this board is in beta currently, so I'm not too bothered by it. After all, I could just scan the QR code from my phone and set it up that way.
After it connected, the device rebooted, and it was go-time.
Configuring openHASP
It's pretty neat
As already mentioned, I somewhat struggled along the way when figuring out how exactly things worked. While this is partially on me for intentionally going in blind, I do feel that the openHASP documentation is not particularly comprehensive for a new user looking to get started. Of course, those looking to use it will likely look up an external guide for setting it up, so it's not too big of a deal. To be clear as well, as I've mentioned in the past, I personally feel that ESPHome has similar problems to openHASP in this regard. Still, once I realized a web server had been hosted and I could just navigate to it in my browser, I was all set.
The website that your ESP32 hosts is fairly rudimentary, but I like it a lot. It's a great way to make it easy for users to do all kinds of basic tasks, from changing the UI theme to taking screenshots of what's currently on the display. When my CYD was first set up, the orientation had swapped around from the way I was typically used to. This was a few-second change in openHASP under the display configuration options, and I could just reboot the device to flip the orientation back to being the way I was used to. While you're in here, make sure to configure your MQTT broker, too.
In general, poking around the settings, openHASP is incredibly user-friendly. I love the configuration menu for GPIO interfacing. It's dead simple, and features like this have instantly made me understand the appeal of frameworks like these. It does a great job at simplifying the more "in-depth" settings to a series of dropdowns and checkboxes, making it accessible to anyone.
However, what openHASP really excels at is its implementation of LVGL. LVGL stands for Light and Versatile Graphics Library, and it's a way to create a beautiful UI on a small, embedded device using LVGL widgets that have a very small device footprint overall. LVGL support is rather new to ESPHome, whereas openHASP is built around LVGL. For example, a sample code snippet to draw on the display can look like this:
{"page":1,"id":1,"obj":"btn","x":0,"y":0,"w":240,"h":30,"text":"openHASP","value_font":22,"bg_color":"#2C3E50","text_color":"#FFFFFF","radius":0,"border_side":0}{"page":1,"id":2,"obj":"btn","x":10,"y":40,"w":105,"h":90,"toggle":true,"text":"\uE335","text_font":32,"mode":"break","align":1}
{"page":1,"id":3,"obj":"dropdown","x":10,"y":140,"w":170,"h":30,"options":"Apples\nBananas\nOranges\nMelon"}
{"page":0,"id":1,"obj":"label","x":175,"y":5,"h":30,"w":62,"text":"00.0°C","align":2,"bg_color":"#2C3E50","text_color":"#FFFFFF"}
The above options add a toggle light and a dropdown box, alongside a temperature scale shown on every page.
In openHASP, rather than defining pages and then writing a mixture of YAML and C++ lambdas to define what's displayed, you instead write singular lines at a time depicting what page the item is on, what the object is, its coordinates, the text, font size, color, and any additional parameters. Each object is instantiated with the flag saying what page it's on, which is already pretty helpful. As for the header, page "0" refers to something that's displayed on every page, so you can easily create a header shown everywhere.
If you want to integrate it with Home Assistant, things are pretty easy there, too.
Integrating Home Assistant
Simple with an integration and an MQTT broker
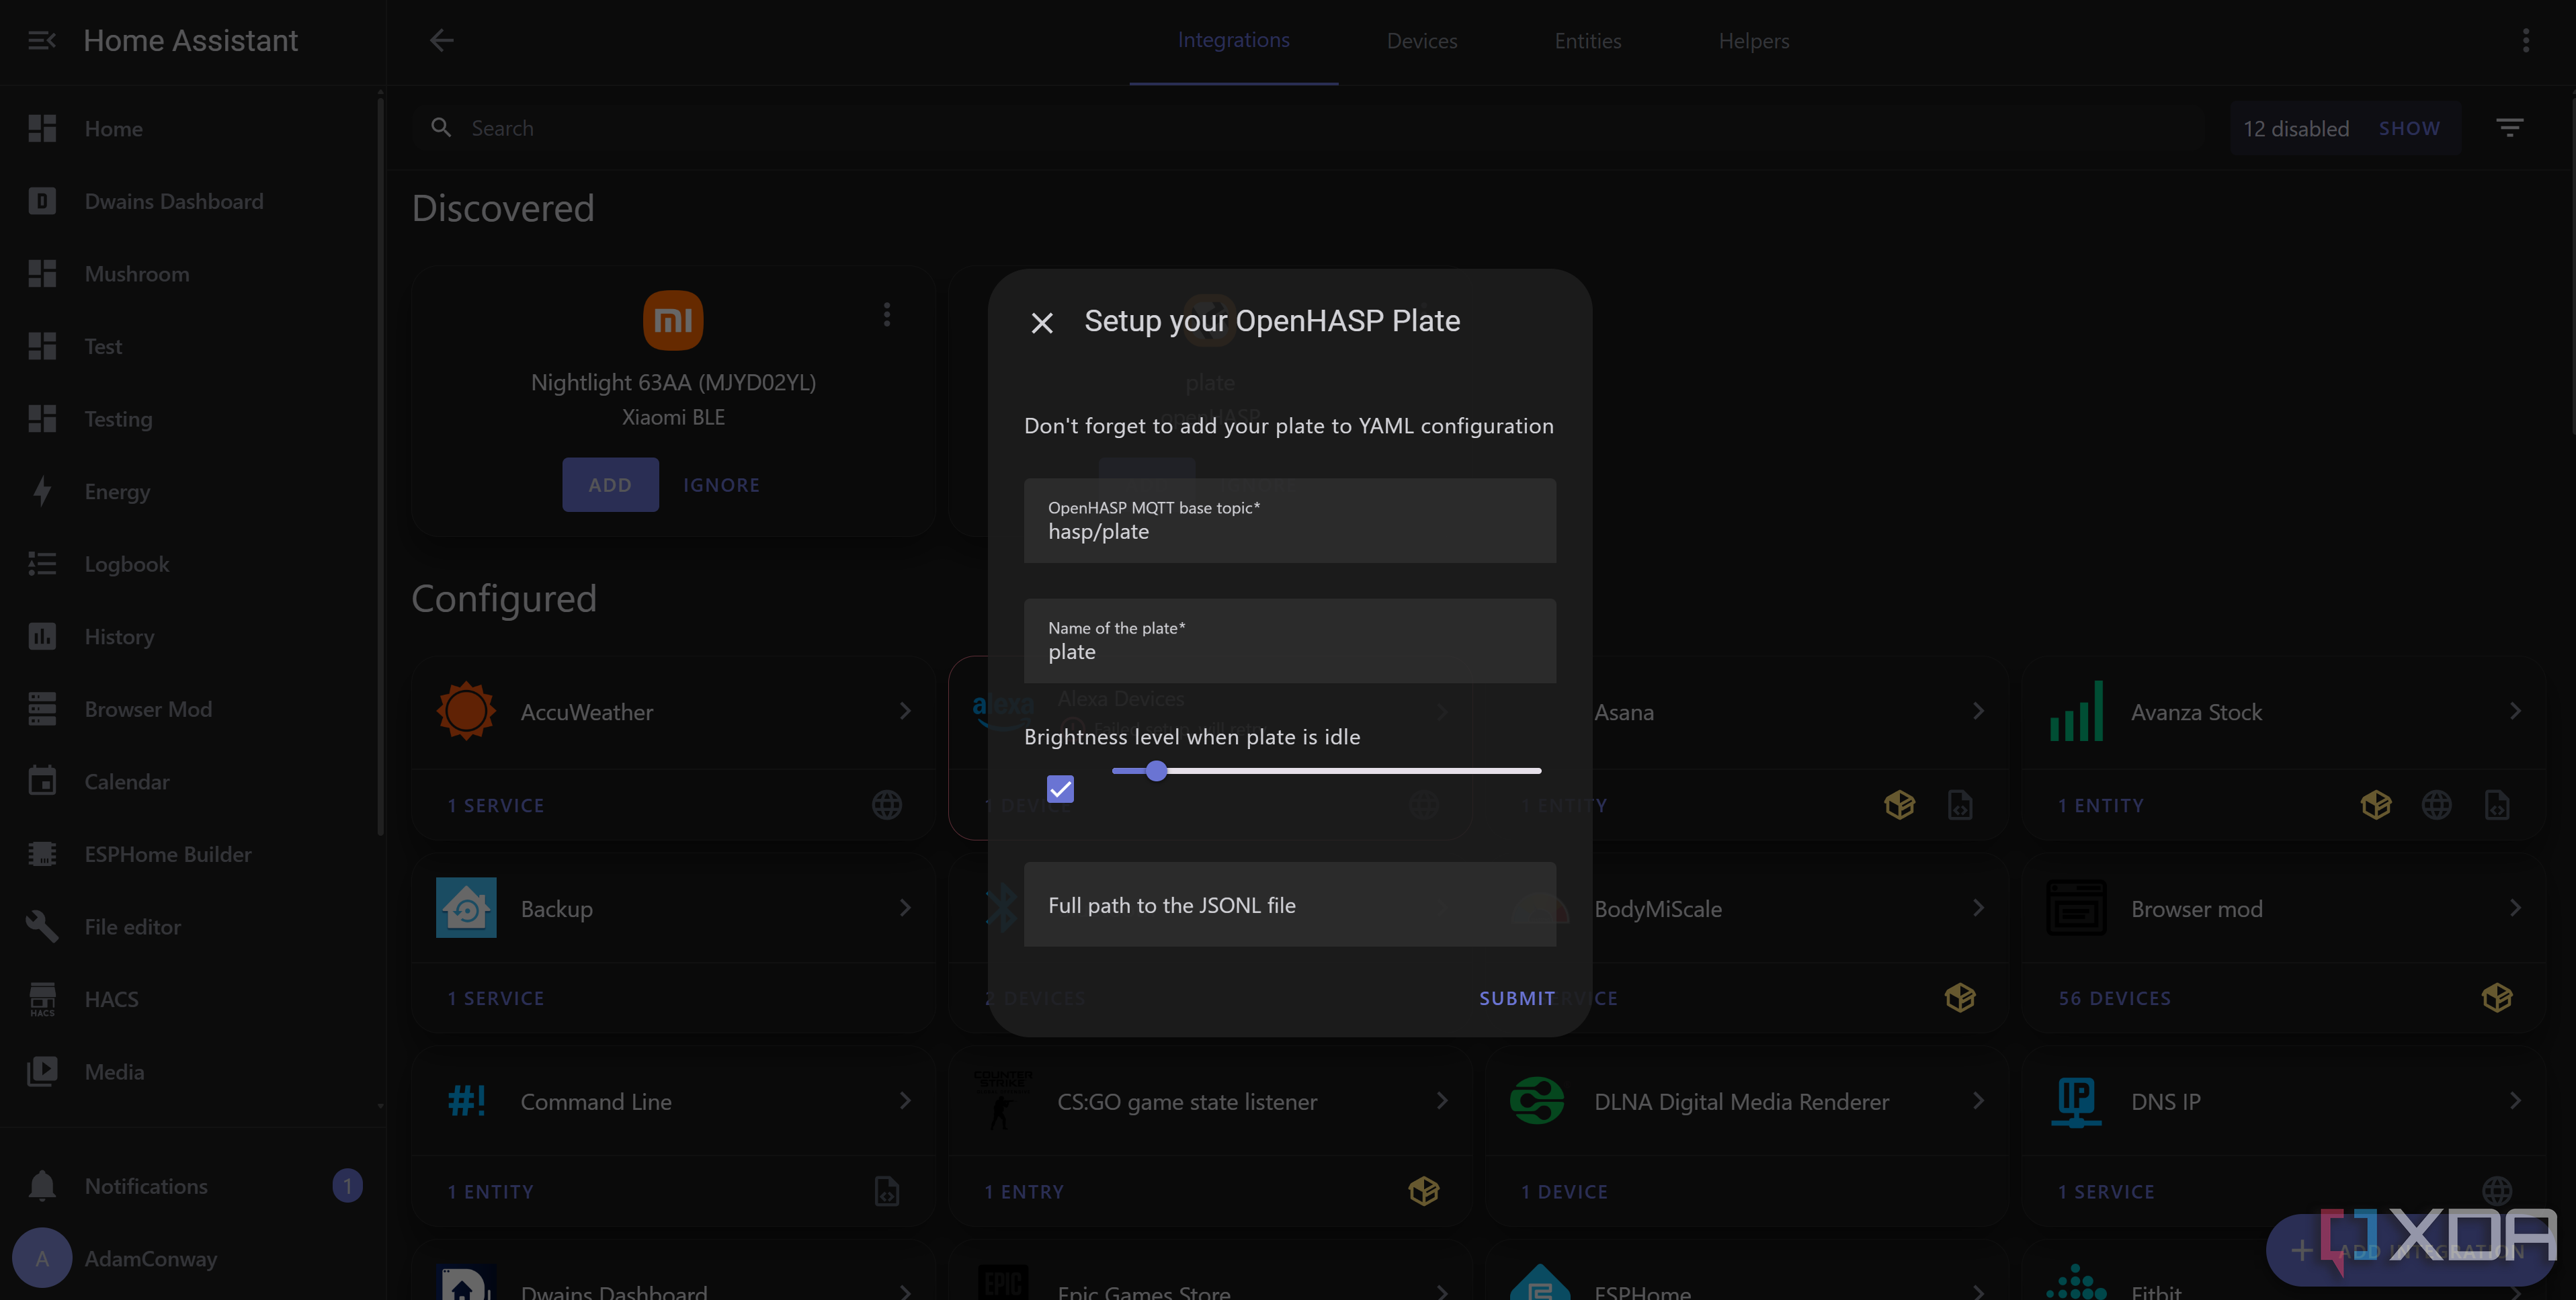
openHASP integrates very well with Home Assistant, and some of the sample configurations provided actually demonstrate how it works. You'll first need to install HACS so that you can install the openHASP integration, and this will enable you to add your devices to your Home Assistant instance. Once configured, openHASP can query your MQTT broker, see any entry under /hasp, and raise the device as an option for discovery. You still need to add a bit more to your Home Assistant configuration to get it working, and the annoying part is that you'll need to add it to your configuration.yaml. This means restarting your entire Home Assistant instance to read in the new values to associate with the integration.
For example, remember that light bulb controller and the temperature sensor we showed? Here's how you build out the Home Assistant side of things to get it up and running:
plate:objects:
- obj: "p0b1" # temperature label on all pages
properties:
"text": '{{ states("sensor.living_room_temp_humidity_temperature") }}°C'
- obj: "p1b2" # light-switch toggle button
properties:
"val": '{{ 1 if states("light.office_light") == "on" else 0 }}'
"text": '{{ "\uE6E8" if is_state("light.office_light", "on") else "\uE335" | e }}'
event:
"up":
- service: homeassistant.toggle
entity_id: "light.office_light"
This directly reads the state of your defined sensors and sends data back to your CYD based on the data it sees. You reference objects like "p0b1", which references the device of ID 1 on page 0, which is our temperature sensor. It may seem a little bit cumbersome to essentially need to develop in two places at once, but the idea is pretty cool. I'm not a big fan of the requirement to restart Home Assistant every time I modify this file, but it works and that's the main thing.
Give openHASP a try
It's easy to use

If you have an ESP32 CYD or any of the other supported devices, I highly recommend trying out openHASP. I personally find the widgets kind of ugly and love the amount of control I get when using ESPHome, but it's impossible to deny that openHASP significantly simplifies the entire development process from start to finish. You don't even need to deal with the hardware if you don't want to; just flash it, connect it to your network, and you can start making a UI and link it up to Home Assistant.
The amount of time that it took me to draw that button and pull a temperature sensor from Home Assistant, even with my floundering at first, was significantly shorter than it took me to do the same in ESPHome. That's not me saying one is better than the other, but for newcomers, openHASP is genuinely amazing. It's so simple, and means you can focus on the UI and the design rather than needing to worry about the complexities of rendering something to the screen.
Obviously, the one major downside is that it doesn't support every device. Because of the nature of openHASP, you bring a supported device to the platform, rather than making the platform support your device as you would in ESPHome. But if you have a supported device, give it a try, because you won't be disappointed.


 English (US) ·