.png)
I’m a visual thinker, so I usually reach for mind maps and flowcharts when I brainstorm ideas or plan projects. They help me get a full-picture overview of all my thoughts and the nuggets of information I've collected. While Notion isn’t a mind-mapping or flowchart tool, I discovered a hidden gem: Mermaid.js. It’s a text-based diagramming tool that works perfectly within Notion’s code blocks. And it turns out to be exactly what I needed — a minimal and fast tool to create flowcharts and mind maps.

Related
Mermaid is the best Obsidian feature you didn't know about
Visualize your thinking using mermaid diagrams in Obsidian
Why Mermaid?
Anyone can write the code
Notion is highly versatile, and you can leverage it for any aspect of your work life or personal life. But one thing it doesn’t have is a native flowchart or mind-mapping tool. You could try replicating it with some of the databases, but that's not ideal.
This is where Mermaid.js comes in. What I love most about it is how easy it is to use. I don’t know how to code, but the Mermaid syntax is beyond simple. What makes it even easier to follow is that Notion lets you see a live preview of the “picture” that your code generates as you write it. Here's how I use it to build flowcharts and mind maps.
Adding a code block
Creating the code block to start writing my Mermaid syntax
I started by opening a blank page. To insert a Mermaid diagram, I hit the forward slash (/), typed “code”, and selected Code - Mermaid from the dropdown. This opens a code block, which is where you’ll create your diagram with text.
At the top, you’ll see two little dropdowns. The first is the code language, which should already be set to Mermaid. And the second lets you toggle between Code, Preview, and Split. Code only displays your text, Preview only shows the image your code generates, and Split displays both.

Related
Writing the Mermaid syntax
I'm keeping it simple
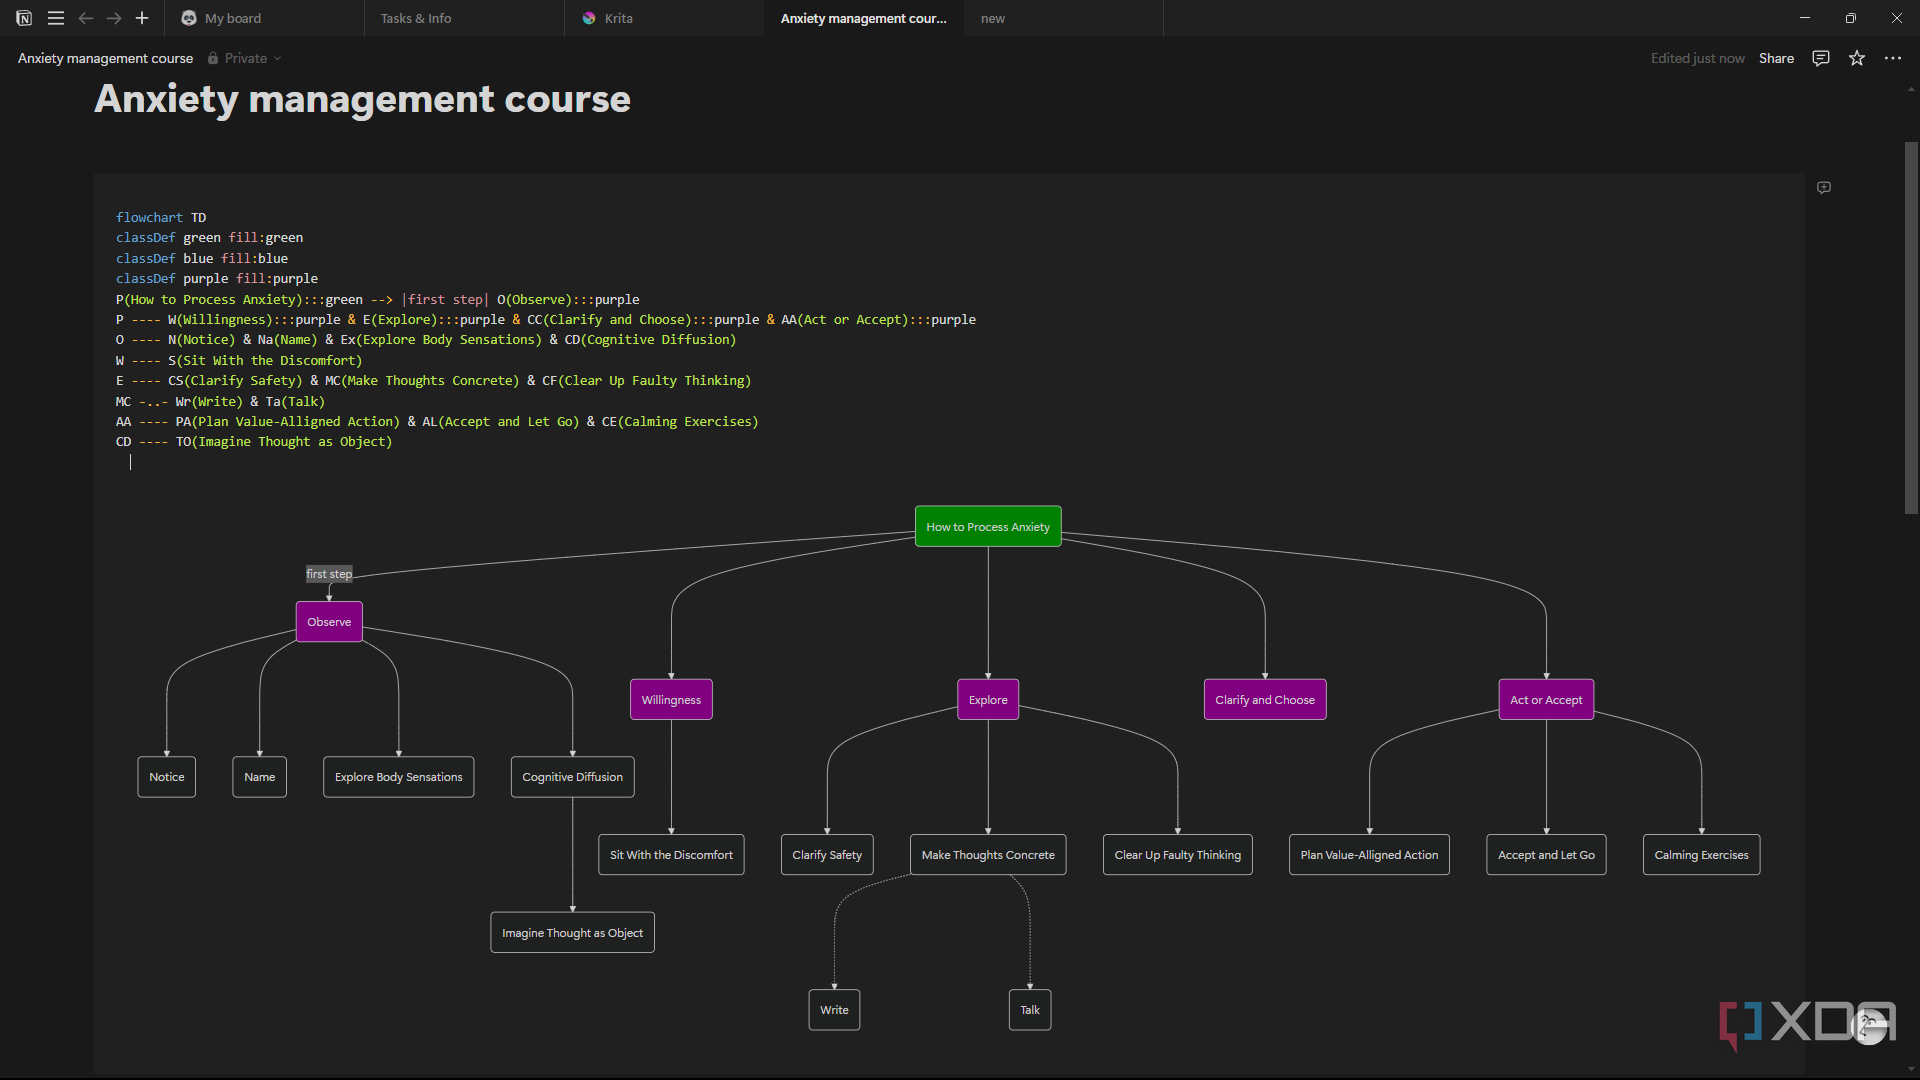
This will be completely dependent on what kind of flowchart you want to create — you can check the official Mermaid documentation for the full rundown of the syntax. I wanted my main idea at the top, with five subcategories branching out from that idea, and then several more categories branching out of those subcategories.
The first line will be the type of diagram you want, so "flowchart", followed by a tag to indicate the direction of the flow — TD for top-down or LR for left-right. The next line is where you’ll start writing your diagram. Every little node (or “bubble") of the flowchart needs an ID followed by the name of the node in brackets. My top node is “How to Process Anxiety”, to which I assigned the ID of “P”.
The point of the ID is to make quick references to that node without typing out its name. For example, if I want multiple nodes to branch out of my P node, I’ll add P on a new line, followed by dashes --- that act as the connecting line, and followed by my new blocks which are separated by “&”.
You can copy this code and fill in your own details if you want a similar structure to mine:
flowchart TDA(main topic) --> B(category) & C(category) & D(category) & E(category) & F(category)
B --- G(item) & H(item) & I(item)
C --- J(item) & K(item) & L(item)
D --- M(item) & N(item) & O(item)
E --- P(item) & Q(item) & R(item)
F --- S(item) & T(item) & V(item)

Related
Refining my syntax
Time to customize my flowchart
Mermaid lets you customize the code beyond nodes and lines. For example, it lets you add comments between connecting lines, change the node shape or color, and change the line type. I’m going to add a couple of these customizations to my code.
First, a couple of comments on my connecting lines. All I did was insert two vertical bars after the arrow and include the text I wanted to display between them. It would look something like this:
A(main topic) --> |comment| B(category)I also wanted to change some of the arrows to dots and crosses, and make some of the lines bold, which would look like this:
B --o G(item) & H(item) & I(item)C --x J(item) & K(item) & L(item)
D ==== M(item) & N(item) & O(item)
You can play around with these until you’re happy with the layout and look of your flowchart. The last change I wanted to make was to the color of the nodes. On a separate line, I added a “classDef” snippet to define the color, and then wrote the color (you can also use a specific hex code). Once that was defined, I added it to the relevant nodes with the triple colon syntax.
Below is the color I used, but you can fill it out with the colors or hex codes you want:
classDef green fill:greenA(main topic):::green --> B(category)
Related
Trying to build a mind map with Mermaid
It's not as great, but doable
At the time of writing, Mermaid doesn’t fully support a “mindmap” syntax in Notion. It’s not compatible with things like classDef and arrow styles. But it does still allow you to build a very simplistic mind map with nodes by using brackets and spaces, and that’s what I did.
I started with the center idea in double brackets and kept expanding by using a new line for every new connection in single brackets. You can copy this code and fill in your own text to get something like mine:
mindmaproot((center idea))
(branch1)
(sub1)
(sub2)
(sub3)
(branch2)
(sub1)
(sub2)
(sub3)
And continue it for as big as your mind map needs to be. Keep in mind that the mindmap syntax is very space-sensitive, so one wrong spacebar placement can break the whole thing. Use two spaces per level and remain consistent. For example, two spaces before every "branch" and four before every "sub".
Related
Notion is more than just a note-taking app
I primarily use Notion to keep track of things with lists, but thanks to Mermaid, it has also become a visual tool of productivity. It’s not that difficult to create the code for the nodes and connections you need — just stick to the documentation (or my code, since it's watered-down), and you’ll have a flowy, visual overview of your projects in no time.


 English (US) ·